17. August 2015
This article is Part 3 of a whole series called Xcode Server Tutorials. Check out Part 2 first if you haven't already. New posts are always tweeted by me (@czechboy0.dev) on Bluesky.
Great to see that you’re hungry for more Xcode Server goodies! And boy, do I have plenty of them for you today. We’ll talk all about prebuild and postbuild scripts. These might initially sound boring, but soon you’ll see that they are in fact very interesting - they allow you to plug in tools like CocoaPods and fastlane, which can easily revolutionize your complete testing and deployment workflow. From messaging you on Slack when your build finishes to automatically uploading builds to the App Store, nothing is impossible. So let’s get started!
Environment
Time has passed since Part 1, so from now on, all tutorials are using Xcode 7 Beta 5 and OS X Server 5 Beta 4. Please make sure to upgrade if at all possible. Take your time, I’ll be waiting here whenever you’re ready. 👍
Objective of this article
Today we’ll discover the full power of prebuild and postbuild scripts in Xcode Server by adding fastlane and CocoaPods to our project. In the process, we’ll learn about the _xcsbuildd user and how to make sure it does what we need. We’ll encounter several common issues, which we’ll fix together. Then we’ll try to add a private CocoaPod, which will make us figure out how to add SSH keys for _xcsbuildd to make it work.
From the feedback I’ve received, this has been the most anticipated topic, so let’s get right into it.
1. Using CocoaPods
CocoaPods is a great dependency manager for Xcode projects. It allows you to integrate other people’s (or your own) code in your project easily. I regularly split my own projects into multiple “Pods”, to make logical modules of my code reusable. Now, let’s say our app will want to use the XcodeServerSDK project to make a cool Bot-aware iOS app (excuse the shameless self-promotion, but I needed a Pod written in Swift 2). Let’s use CocoaPods to add it as a dependency of our project.
I already added the Podfile to our project, so please switch to step3 of the tutorial by, in the XCSTutorialProject1, running
git checkout step3
which will magicly create a Podfile in your project! Then we just need to actually have CocoaPods install the dependencies and start using the workspace instead of the project. So please run
killall Xcode
pod install
open XCSTutorialProject1.xcworkspace
Good! Now our project uses CocoaPods and we’re able to use XcodeServerSDK. Let’s switch our Bot to the new branch (above we only switched our local checkout) and see if it can rebuild our project with the new shiny Pod in it!
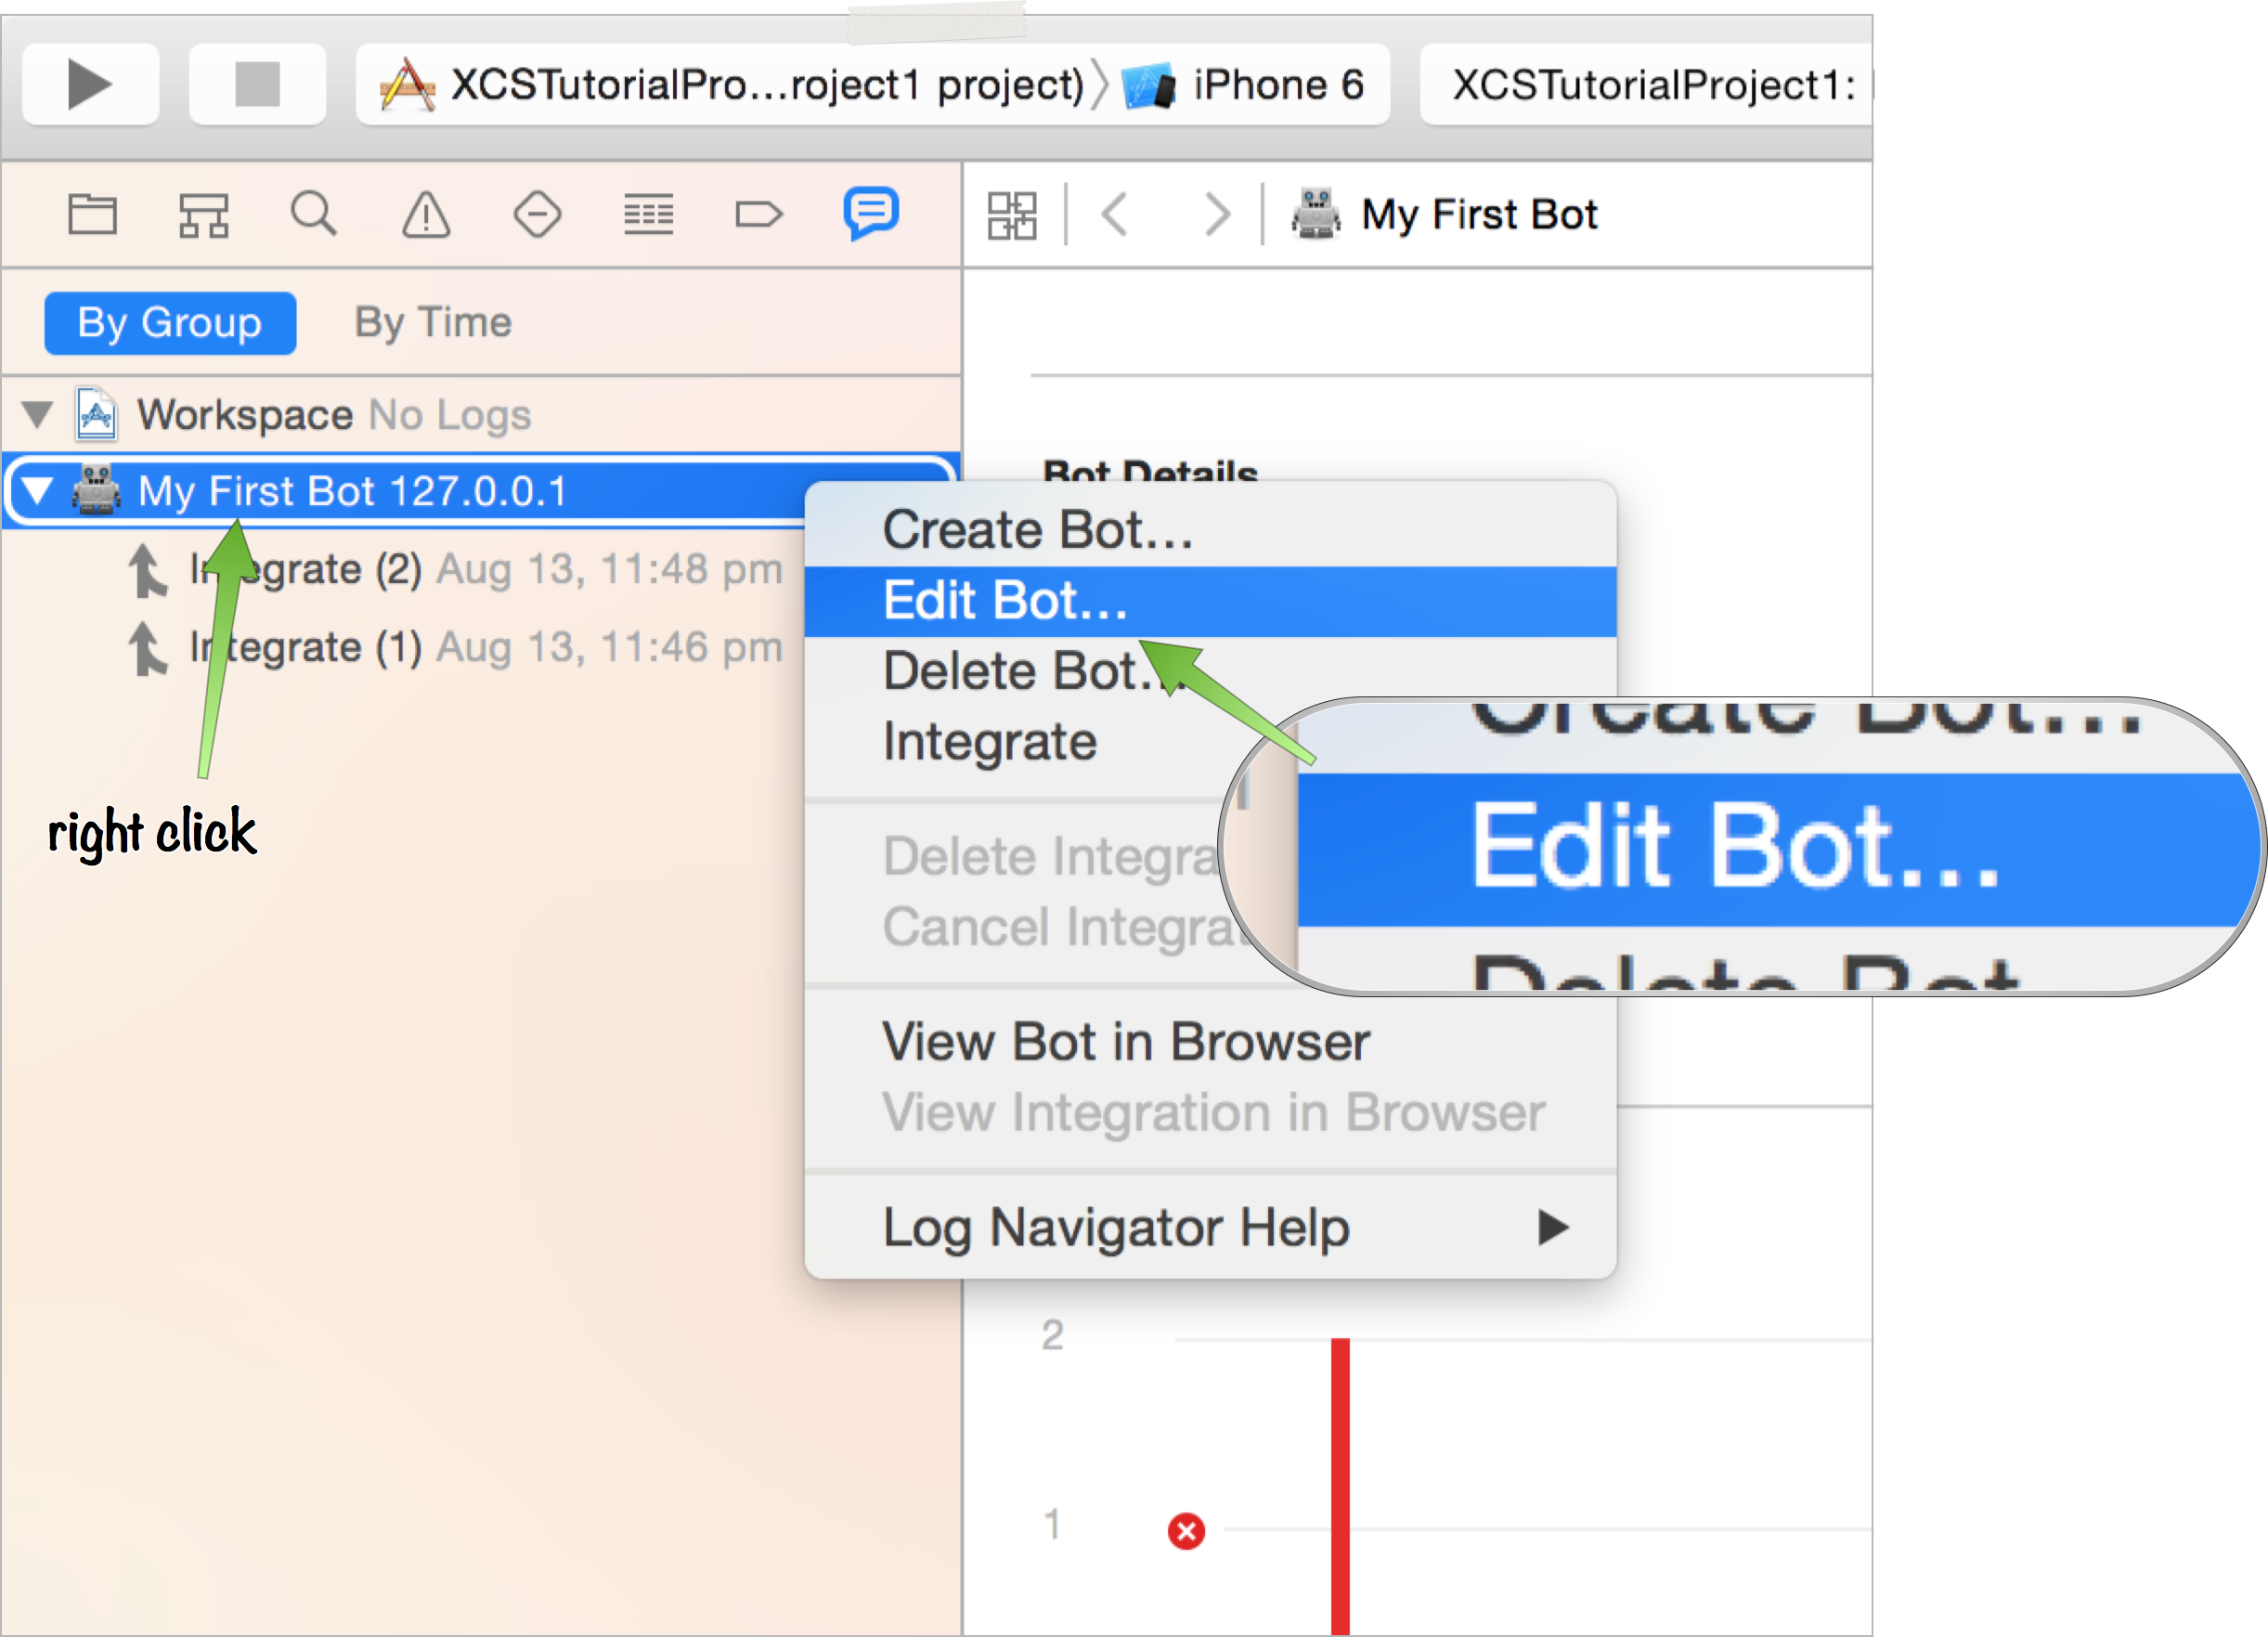
To do that, let’s right-click on the Bot in Xcode and select Edit Bot, which will show the configuration sheet that we saw in Part 1.
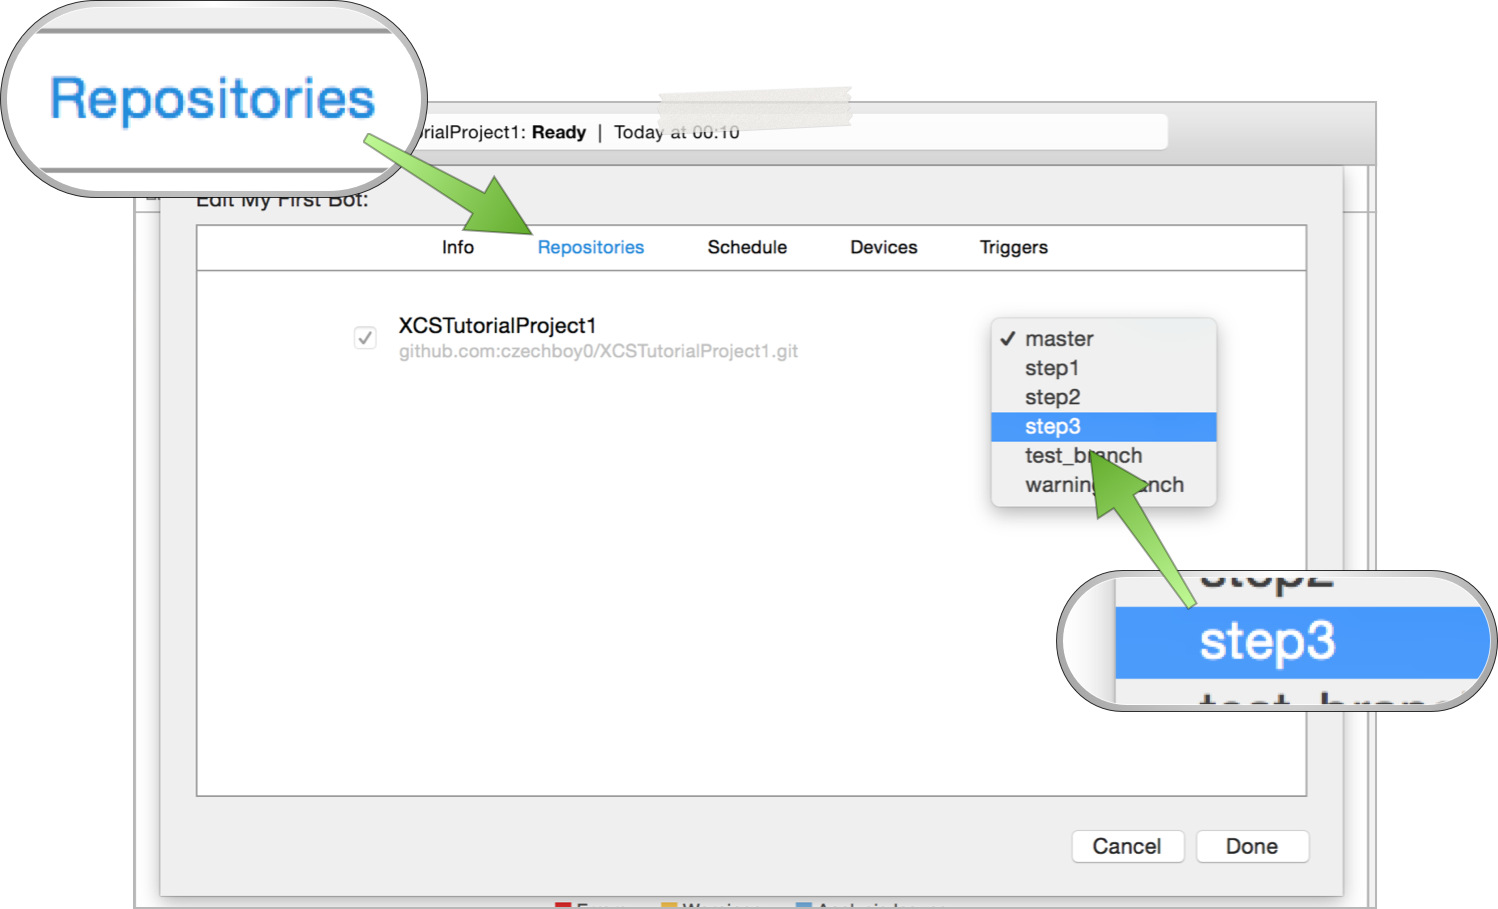
Let’s go to Repositories and switch our Bot to the step3 branch, which will tell it which branch to pull from now on. Previously we were on master. (Also, to save time, feel free to quickly switch to Devices and make sure you only have one Simulator selected for testing.) Then click Done to save it.
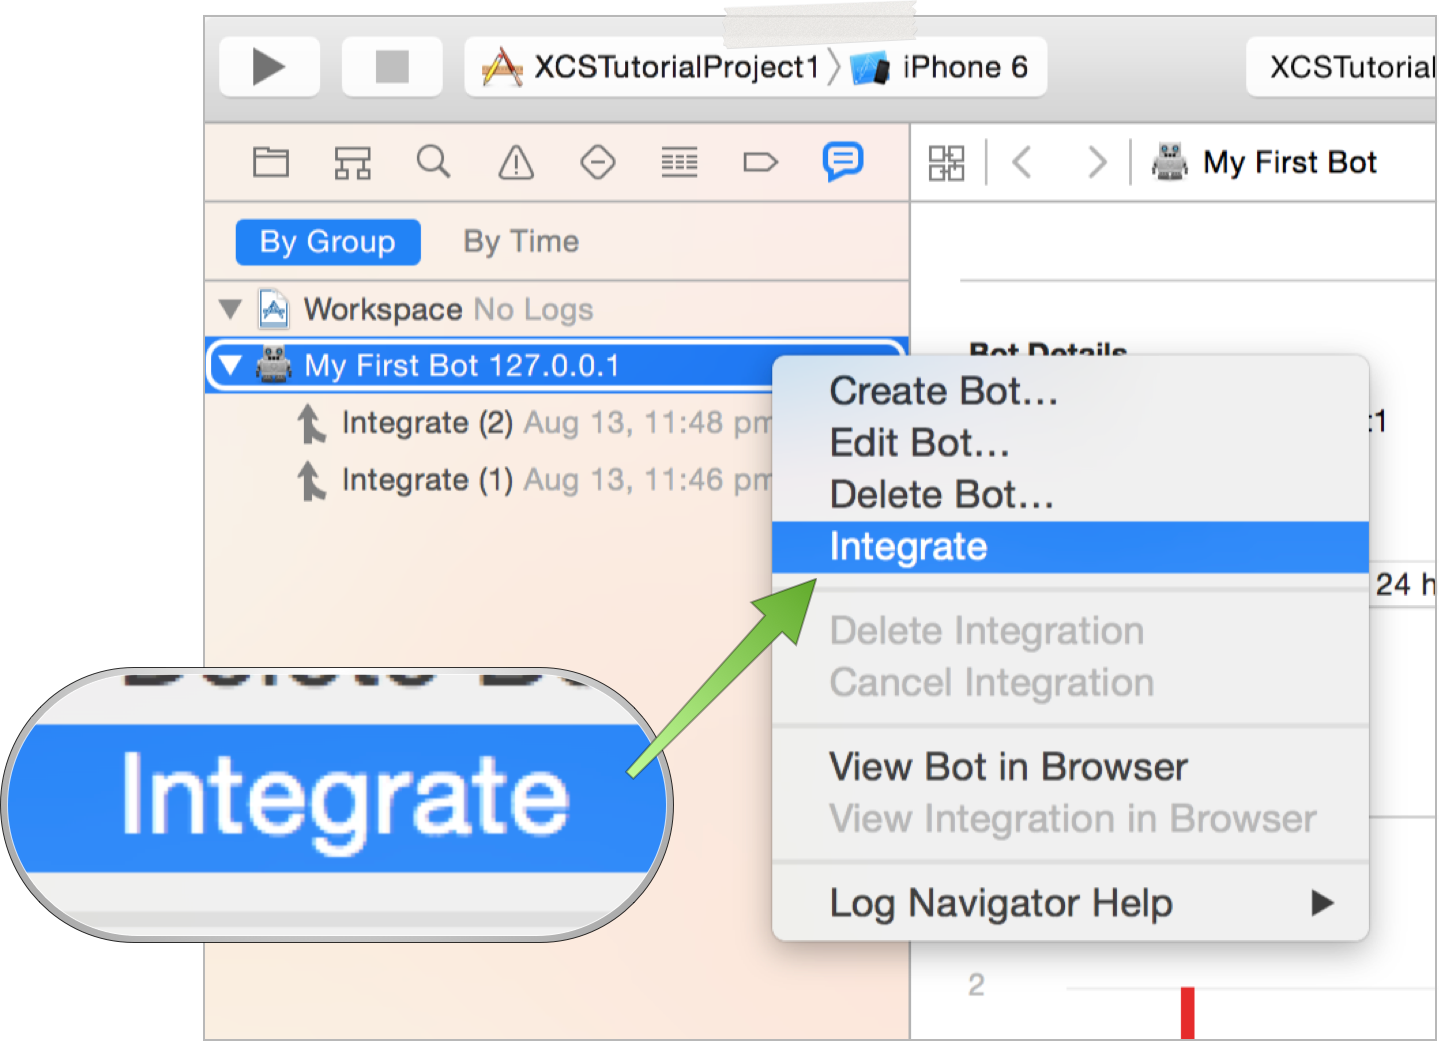
Let’s kick off another Integration by right-clicking on the Bot again, but this time selecting Integrate.
Once that Integration finishes, let’s look at its results like we did in Part 2. Oh, what is that? Seems like we got an error! 😧
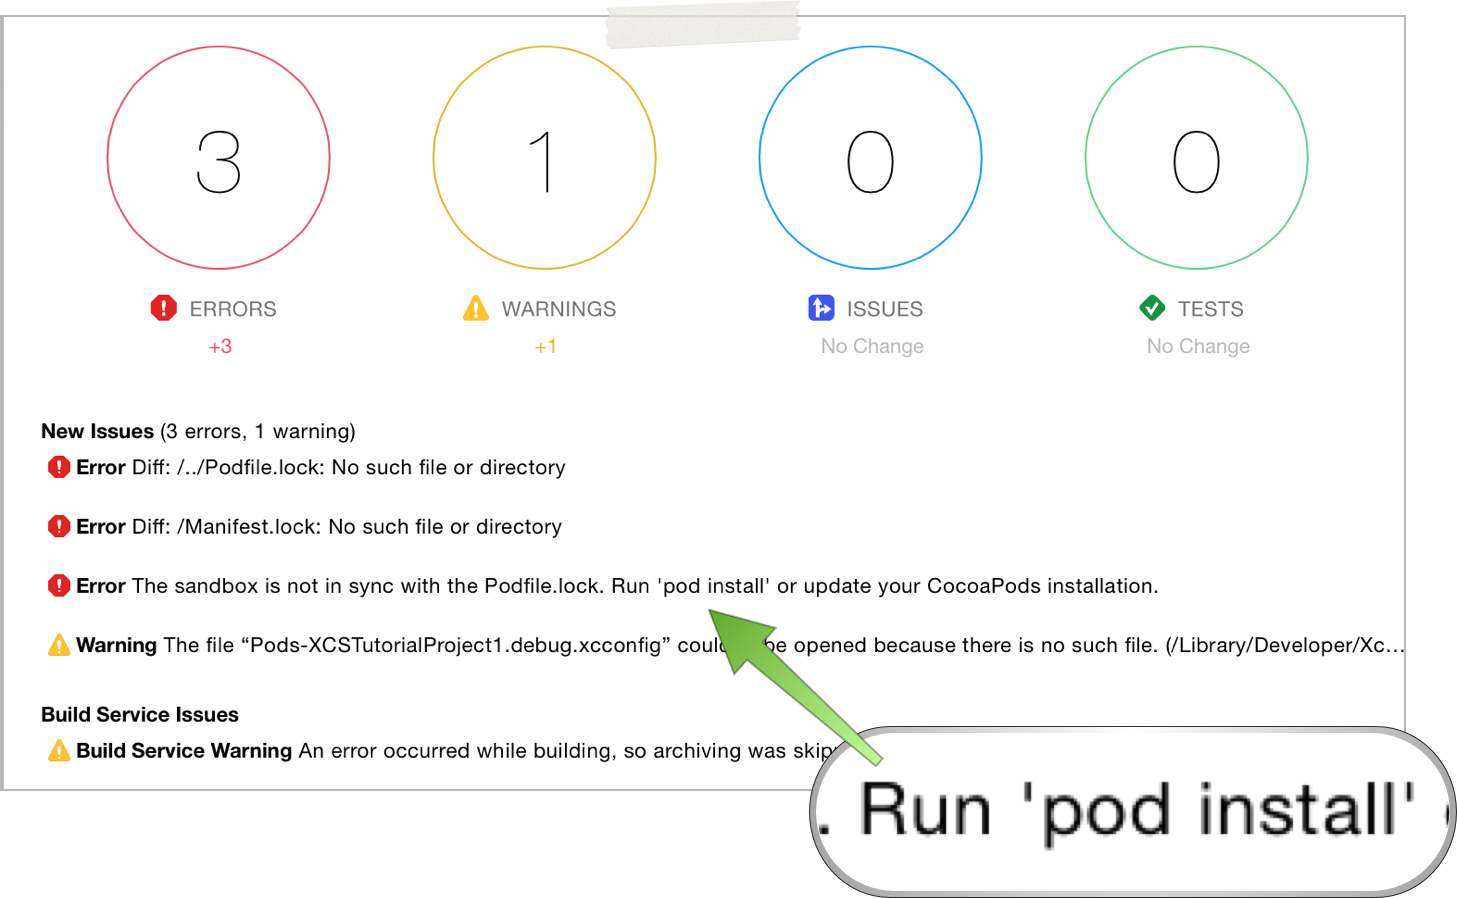
The sandbox is not in sync with the Podfile.lock. Run 'pod install' or update your CocoaPods installation.
Of course, silly me! Since we don’t commit our Pods directory (where the code pulled by CocoaPods lives) into our git repo, our Bot can’t find it. We need to run pod install before every Integration to make things right.
before every Integration
This should sound familiar, because we already covered a way to run something before or after every Integration. That’s what Triggers are for! Script triggers, in our case, are going to help us run CocoaPods before every Integration. Let’s add one now!
2. Prebuild script: run CocoaPods
Let’s edit our Bot again and add a new prebuild script trigger, just like we saw in Part 1 (feel free to go there and see how exactly how we did it and please re-read the ⚠️ Weirdness Alert to understand why we first have to cd into our project directory.)
Since we ran pod install on our local machine, let’s just add a simple prebuild script like this
cd XCSTutorialProject1
pod install
Again, save the Bot and re-Integrate it.
2.1 Search Path Issues
You might (but you probably won’t) get a Trigger Error now that says something like
Trigger script exited with code: 127 /var/folders...: line 3: pod: command not found
this means that the build user can’t find CocoaPods. This might happen if you’re using a homebrew-installed version of Ruby (like I am), in which case, your tools get installed into /usr/local/bin (which is not included in the build user’s PATH variable) instead of /usr/bin (which is). I’ve been asked about this issue and I came up with four solutions (so far). Which is the best one for you depends on whether the machine on which you’re going to be running Xcode Server is your development machine or a separate build machine. Here I sorted them from the simplest workarounds to more robust solutions:
1) specify the full path to your tool: /usr/local/bin/pod install in our case
2) manually add the extra search path by adding a line export PATH="/usr/local/bin:$PATH" at the beginning of the script
3) create a symbolic link by running the following command:
sudo ln -s /usr/local/bin/pod /usr/bin/pod
just once, which would make pod available in /usr/bin, but actually point to the executable in /usr/local/bin
4) combine the solutions above, e.g. 1) + 2) run fastlane from a fully qualified path /usr/local/bin/fastlane and as the first step of your Fastfile, add sh "export PATH=\"/usr/local/bin:$PATH\"". From that point you should be able to call e.g. CocoaPods by just pod instead of /usr/local/bin/pod. Or 3) + 2), where you only create a symlink for fastlane.
Personally, I’d use 3) if there is only a few tools I need to trigger. If there are more, I’d go for 1) + 2). Feel free to ping me with more solutions that you come up with. Ideally, if you can come up with a way to modify PATH of the _xcsbuildd user permanently, definitely let me know and I’ll add it here. That would be the best solution.
Update (14th Sep, 2015): I’ve heard that the symbolic link solution doesn’t seem to work with El Cap anymore, plus it makes using multiple versions of Ruby with rvm very difficult. See this article I wrote about fixing this issue.
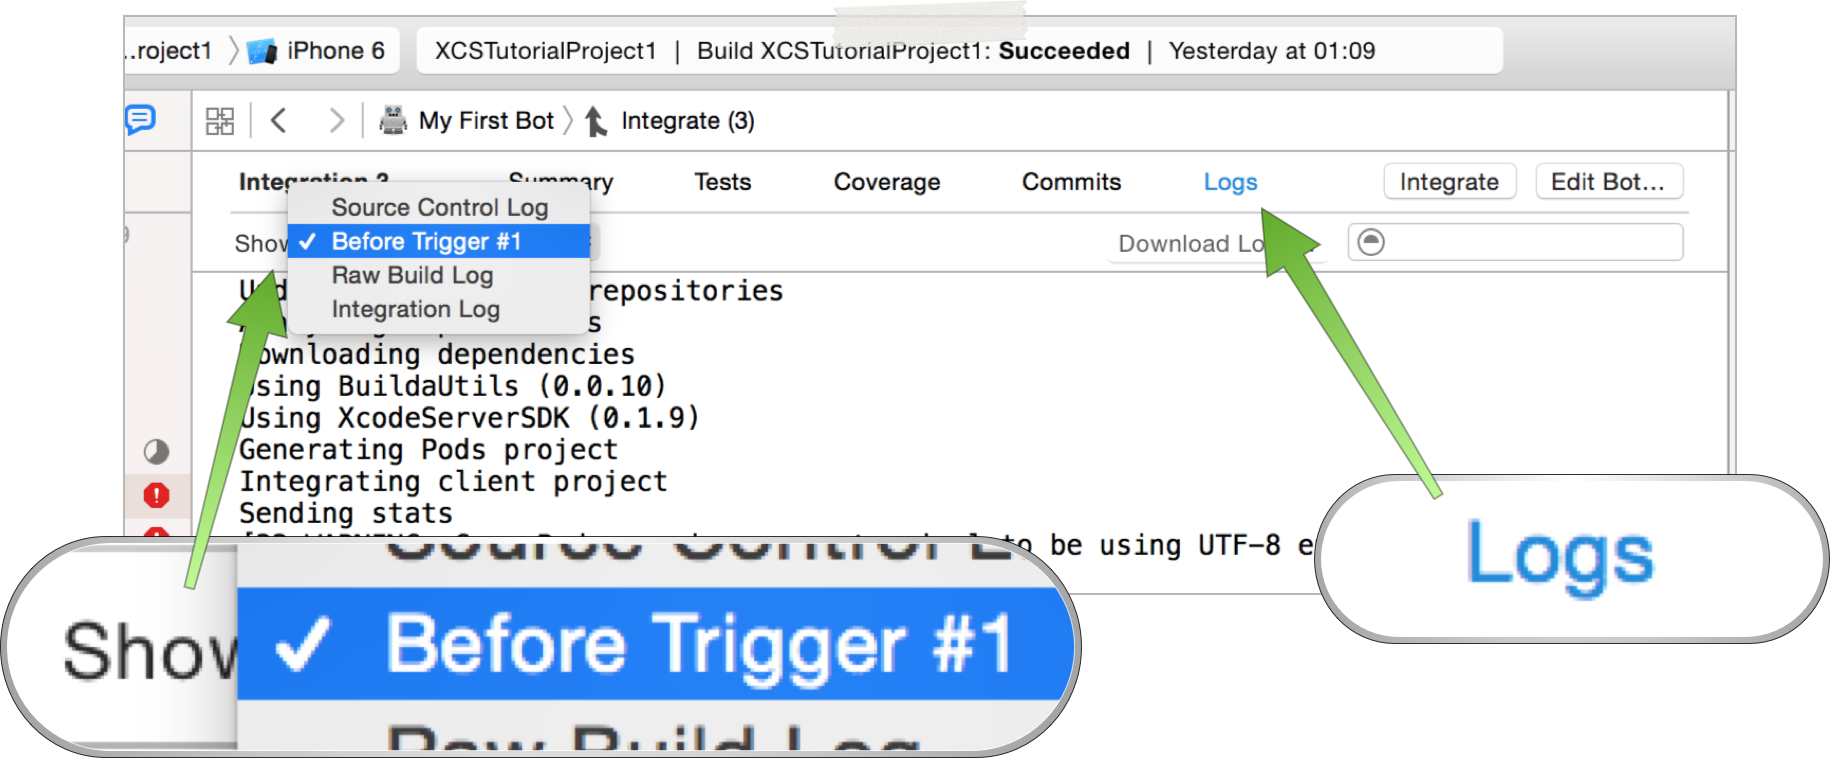
But again, if you’re using the system installation of Ruby (and you’re not using any homebrew-installed tools), you won’t encounter this issue. Either way, make sure to re-Integrate if you had to apply one of these fixes. Once it finishes, take a look at the full script output by going to Logs -> Show -> Before Trigger #1.
3. The famous _xcsbuildd user is here
Let’s say you did want to do this properly for your dedicated build server and chose to use solution 4. How would you go about doing it? Let me introduce you to the _xcsbuildd user.
In Under the Hood of Xcode Server I mentioned that Xcode Server runs many daemons on your machine plus an extra user called _xcsbuildd which does all the building. Don’t believe me? Run users in your Terminal right now and you should see yourself and the _xcsbuildd user being logged in. It’s there, ready for your Bots.
Since _xcsbuildd is a completely separate user, it doesn’t share state with your user, specifically your home folder (/Users/honzadvorsky in my case). Instead, _xcsbuildd‘s home folder is at /var/_xcsbuildd. The reason why this is important is because many tools, Ruby Gems and CocoaPods being one of them, rely on your home folder having some of their data set up (if you don’t install gems globally).
3.1 Logging in as _xcsbuildd
In order to make these tools available to our build user, we need to log in as the _xcsbuildd user now. Macs, being Unix-based machines, have preinstalled tools called su and sudo to switch users and gain root permissions. Since we don’t know _xcsbuildd‘s password, we’ll need to use sudo for our login command - which will be su - _xcsbuildd (the dash is so that the whole environment is switched to the new user). Combining these, to log in as _xcsbuildd, we need to run
$ sudo su - _xcsbuildd
su: /bin/false: No such file or directory
Doesn’t work. Turns out that _xcsbuildd doesn’t have a shell set up (a way to have an interactive login session), currently it has it set as /bin/false, which is just a glorified way of saying nope. Let’s set a shell for our friend then! We’ll use another preinstalled tool called dscl.
$ sudo dscl localhost -change /Local/Default/Users/_xcsbuildd UserShell /bin/false /bin/bash
Don’t feel intimidated - you only need to run this once to be forever able to login as _xcsbuildd. What we’re saying here is:
“Hey directory service, on this computer, please change the shell of the user
_xcsbuilddfrom/bin/falseto/bin/bash.”
If it prints nothing, that’s a good sign. (There is also a way to change the shell in OS X Server. See this Tweet, where in OS X Server -> Users you can show System Accounts, right click on _xcsbuildd and change the shell in Advanced Options. Thanks, @pm_kowal!)
Let’s try to log in as _xcsbuildd again…
$ sudo su - _xcsbuildd
honza-dvorskys-mbpr-14:~ _xcsbuildd$
Success! 🎉 Let’s verify that we did the right thing by running
$ whoami
_xcsbuildd
$ pwd ~
/var/_xcsbuildd
Perfect. We’re now logged in as _xcsbuildd whose home directory is /var/_xcsbuildd!
4. Private CocoaPod
Now, I usually use this newly-found power to show people how to add SSH keys to the _xcsbuildd user. The reason why that’s necessary is that many people have their own private CocoaPods saved in a private git repository. I had to solve this problem at work and that’s how I first encountered this issue.
💭 You might say, slow down, didn’t we already tell Xcode Server how to access our private git repositories by telling it our SSH keys when setting up our first Bot? We did indeed, however that information was only sent over HTTPS in a format called scm blueprint, which Xcode Server only uses to check out our repository (see XcodeServerSDK and what information is sent over when creating a Bot). These SSH keys are sent over just for this purpose, but they aren’t added as standard SSH keys to the _xcsbuildd user, meaning they are not available in our scripts, unfortunately.
If you now add a private CocoaPods spec repository to your Podfile and try to integrate, the script will fail with something like
Cloning into 'MySuperSecretPodspecRepository'...
Host key verification failed.
fatal: Could not read from remote repository.

Please make sure you have the correct access rights
and the repository exists.
4.1 Adding SSH keys
Fair enough. You have two options now:
Reuse existing keys
You can copy your existing SSH keys to /var/_xcsbuildd/.ssh and change their ownership. You’d run:
$ sudo -s
$ mkdir /var/_xcsbuildd/.ssh
$ cp /Users/honzadvorsky/.ssh/id_rsa /var/_xcsbuildd/.ssh/
$ cp /Users/honzadvorsky/.ssh/id_rsa.pub /var/_xcsbuildd/.ssh/
$ cp /Users/honzadvorsky/.ssh/known_hosts /var/_xcsbuildd/.ssh/
$ chown _xcsbuildd:_xcs /var/_xcsbuildd/.ssh/id_rsa
$ chown _xcsbuildd:_xcs /var/_xcsbuildd/.ssh/id_rsa.pub
$ chown _xcsbuildd:_xcs /var/_xcsbuildd/.ssh/known_hosts
$ exit
We use sudo -s to start a root session so that we don’t have to prepend every subsequent command with sudo. With chown we make sure the new copy of our keys belongs to the _xcsbuildd user so that it can access them. We also need to copy the known_hosts file to not be asked about trusting new servers again.
This solution works fine, but for increased security, it’s probably better practice to create separate SSH keys for each user.
Generate new keys
Let’s start by using our new skill: log in as _xcsbuildd. Try to remember how to do it, but you can always look it up above if you get stuck.
$ whoami # make sure we're _xcsbuildd
$ ssh-keygen -t rsa
I usually don’t change the defaults, so I just hit return three times and get a confirmation that my new keys have been successfully created.
...
Your identification has been saved in /var/_xcsbuildd/.ssh/id_rsa.
Your public key has been saved in /var/_xcsbuildd/.ssh/id_rsa.pub.
...
$ exit # switch back to your user
Once you’ve switched back to your user, there’s a quick way to copy the new public key
sudo cat /var/_xcsbuildd/.ssh/id_rsa.pub | pbcopy
pbcopy is another preinstalled tool, which pipes its input into the clipboard. Super handy!
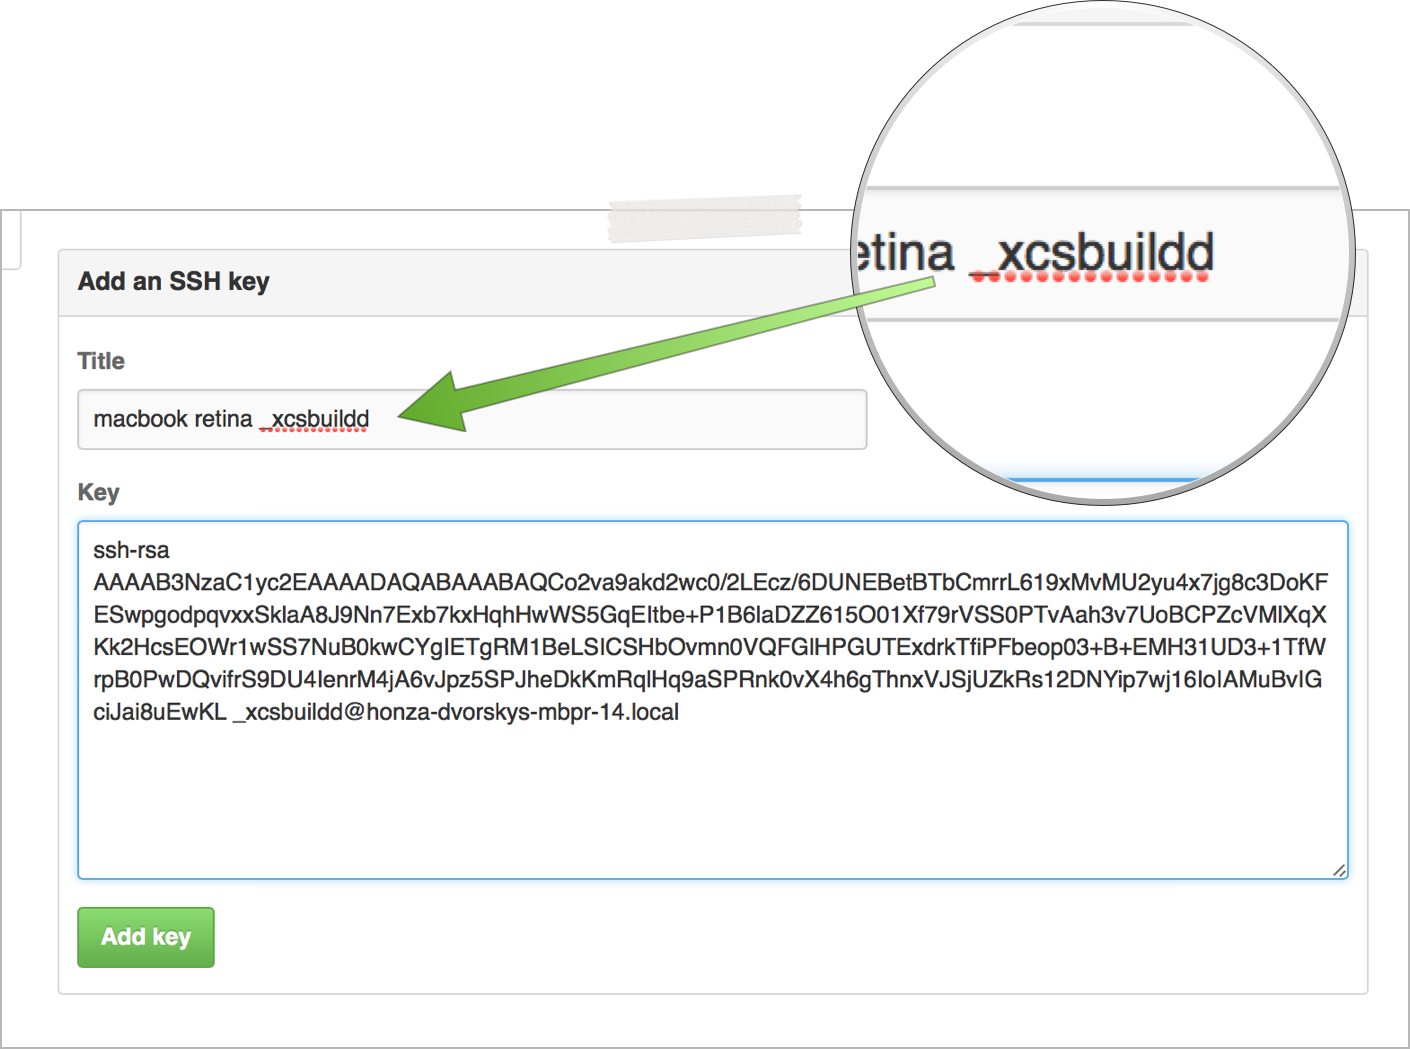
Now we just need to add our new public key to e.g. GitHub in Settings -> SSK keys -> Add SSH key. Make sure to name it appropriately so that you remember it’s the _xcsbuildd‘s public key. (The example screenshot below is from GitHub, but add your new public key to whatever git hosting service you’re using.)
4.2 Confirming known_hosts
If you try to re-run your Integration now, you’ll see that the script is still failing with
Cloning spec repo `czechboy0` from `[email protected]:czechboy0/MySuperSecretPodspecRepository.git`
[!] Unable to add a source with url `[email protected]:czechboy0/MySuperSecretPodspecRepository.git` named `czechboy0`.
No worries - the SSH keys are all good, unfortunately we still need to confirm that _xcsbuildd trusts the (in my case) GitHub server. Let’s do that now! Log in as _xcsbuildd again and run:
$ ssh -T [email protected] # substitute with your podspec git repo's server
The authenticity of host 'github.com (192.30.252.131)' can't be established.
RSA key fingerprint is 16:27:ac:a5:76:28:2d:36:63:1b:56:4d:eb:df:a6:48.
Are you sure you want to continue connecting (yes/no)?
$ yes
Warning: Permanently added 'github.com,192.30.252.131' (RSA) to the list of known hosts.
Hi czechboy0! You've successfully authenticated, but GitHub does not provide shell access.
Cool! Let’s run it again just to confirm…
$ ssh -T [email protected]
Hi czechboy0! You've successfully authenticated, but GitHub does not provide shell access.
Perfect. Now re-Integrate again and your private Pod should get installed correctly! 🎆
5. Postbuild script: run fastlane
Cool, so we got our prebuild script working all the way! Apologies for the length of the previous section, but I know how many people struggle with setting private Pods correctly, so I wanted to settle this once and for all. ☺️
Now, for our postbuild script, let’s say we want to get a message on Slack and the computer to speak to us when our build finishes. fastlane is a powerful tool for running all sorts of actions, but I wanted to pick something simple for now. Obviously, you can add any action to your Fastfile that you want! (like uploading to Crashlytics Beta/HockeyApp/TestFlight etc) (By the way, you could also migrate our prebuild script to fastlane by using the install_cocoapods action).
We could go use our trial-and-error approach from before, but this time we already know what we need to do. 😎 I’ll assume you’ve installed fastlane (sudo gem install fastlane), so we need to make sure fastlane is runnable from our postbuild script. Again, if you’re using non-system Ruby, you’ll need to create a symlink first by running
sudo ln -s /usr/local/bin/fastlane /usr/bin/fastlane
Next, we’ll add a simple Fastfile with the slack and say actions. I’ve done that for you, so please switch your local branch with git checkout step4 and your Bot’s branch to step4 (like we did above from Xcode).
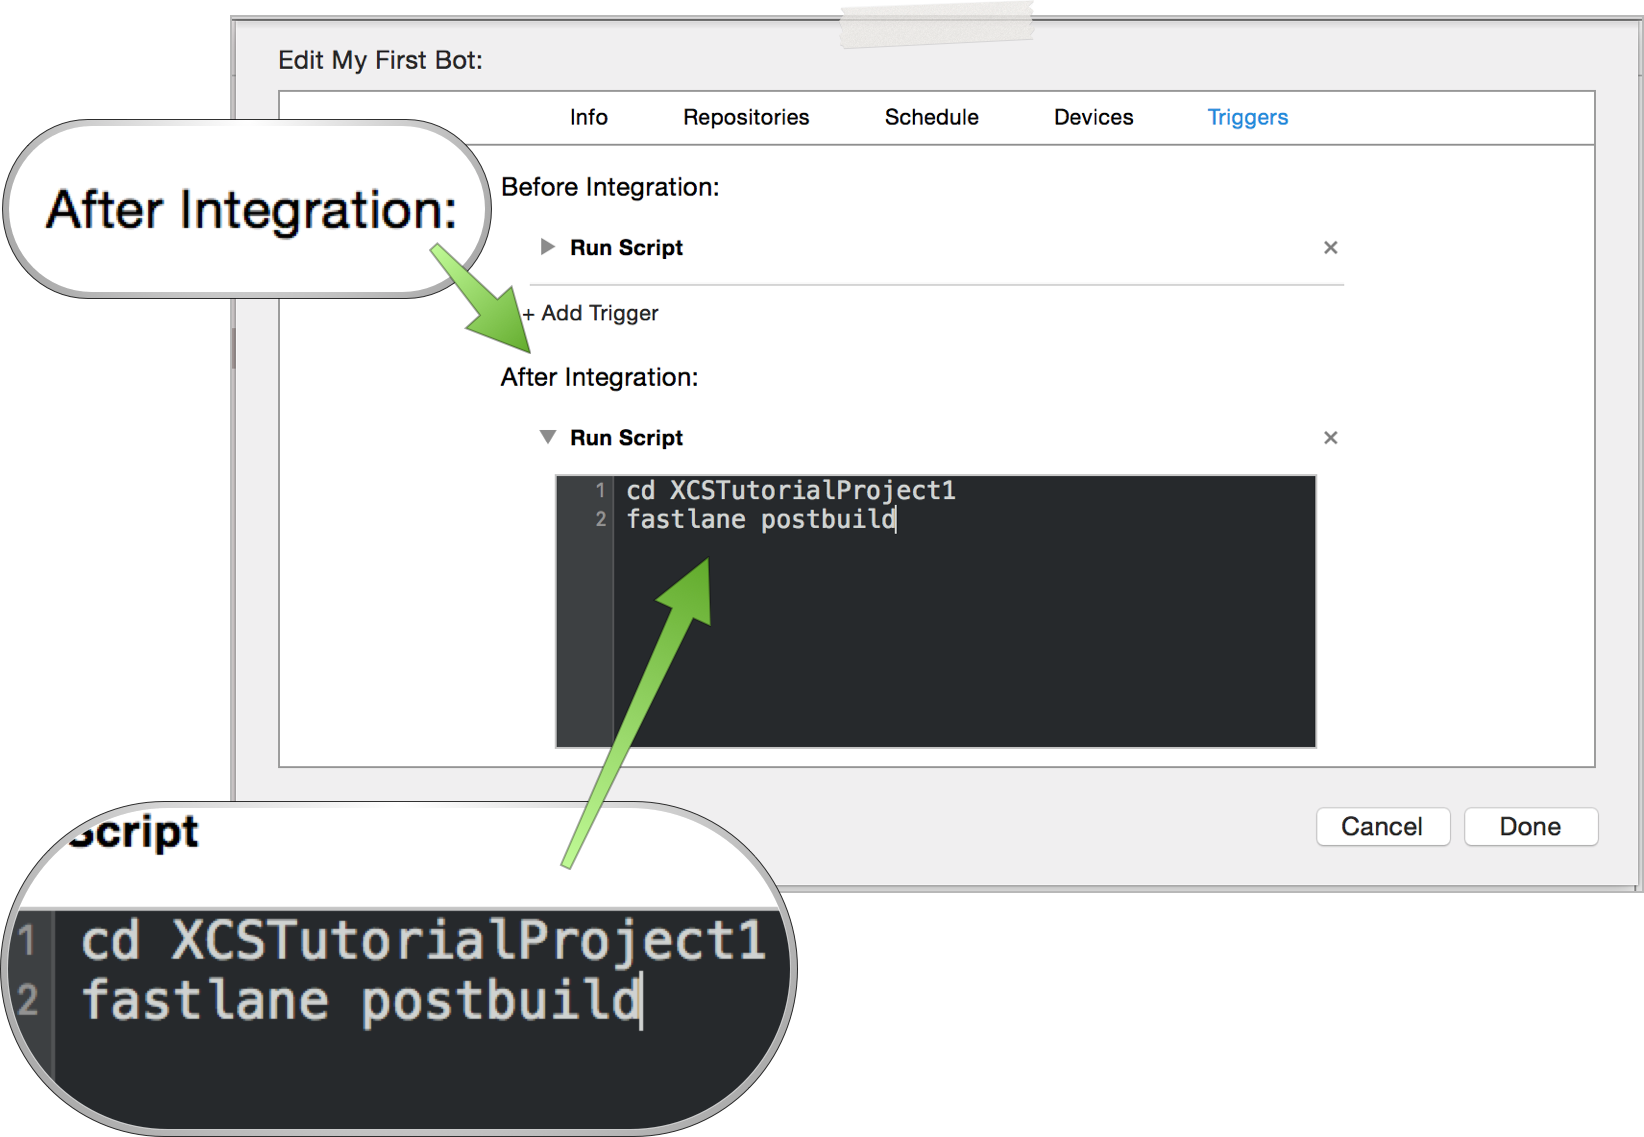
And this time let’s add a postbuild script, instead of prebuild. It should say
cd XCSTutorialProject1
fastlane postbuild
That’s it! We just tell fastlane to run our lane called “postbuild”, which will perform the above actions for us. Neat! Re-integrate your Bot to hear you computer speak to you 👾
6. Environment variables in scripts
Xcode Server also gives you a couple of useful environment variables, so that you can make the right decisions in your scripts. You get metadata about the Integration and the Bot, result of the Integration, assets folder and logs locations on disk and more. See most of the XCS variables below (there are missing ones that show up when you create an archive, for example.) If you’re ever curious, just add the command set to your script and it will dump all the environment variables just like this.
XCS=1
XCS_ANALYZER_WARNING_CHANGE=0
XCS_ANALYZER_WARNING_COUNT=0
XCS_ARCHIVE
XCS_BOT_ID=b8dc7112eda9d6a111f67a04ce046bf7
XCS_BOT_NAME='My First Bot'
XCS_BOT_TINY_ID=0F536B6
XCS_DERIVED_DATA_DIR=/Library/Developer/XcodeServer/Integrations/Caches/b8dc7112eda9d6a111f67a04ce046bf7/DerivedData
XCS_ERROR_CHANGE=-9
XCS_ERROR_COUNT=1
XCS_INTEGRATION_ID=b8dc7112eda9d6a111f67a04ce07b055
XCS_INTEGRATION_NUMBER=15
XCS_INTEGRATION_RESULT=trigger-error
XCS_INTEGRATION_TINY_ID=B905C2D
XCS_OUTPUT_DIR=/Library/Developer/XcodeServer/Integrations/Integration-b8dc7112eda9d6a111f67a04ce07b055
XCS_PRODUCT
XCS_SOURCE_DIR=/Library/Developer/XcodeServer/Integrations/Caches/b8dc7112eda9d6a111f67a04ce046bf7/Source
XCS_TESTS_CHANGE=-2
XCS_TESTS_COUNT=0
XCS_TEST_FAILURE_CHANGE=0
XCS_TEST_FAILURE_COUNT=0
XCS_WARNING_CHANGE=0
XCS_WARNING_COUNT=0
XCS_XCODEBUILD_LOG=/Library/Developer/XcodeServer/Integrations/Integration-b8dc7112eda9d6a111f67a04ce07b055/xcodebuild.log
Okay, this is all for today! Great job, you! 👏 This was a bit more technical Tutorial, because it was all about scripts. We learned all about adding CocoaPods and fastlane to our project, we got to meet the mighty _xcsbuildd user for whom we added SSH keys, we encountered and together fixed many issues and at the end, we found the environment variables we get in our scripts for free. I hope I answered all your questions about running scripts on Xcode Server. But if I didn’t, please ping me and I might write a short Hack article about anything I’ve missed.
Even though we’ve covered a lot in parts 1 to 3, there’s still a big elephant in the room. And that elephant can’t move because no valid signing identity was found. Yes, next tutorial will be all about code signing on Xcode Server. 📝 How to manage certificates and provisioning profiles to make Xcode Server create archives, test on connected iOS devices and even enable you to install your app on your iPhone just over Wi-Fi. If this sounds at all like something you’d like to be able to do, stay tuned for the next Xcode Server Tutorial! 🚀
I hope you found this useful or interesting. For criticism, praise and future articles, I’m @czechboy0.dev on Bluesky.