04. August 2015
This article is Part 1 of a whole series called Xcode Server Tutorials. New posts are always tweeted by me (@czechboy0.dev) on Bluesky.
We all know how it works. Your iOS teammate works on a feature branch for weeks and he doesn’t merge changes from other people into his branch during this time. Then your PM starts pushing the team to deliver said feature, so a pull request is created, people skim over the code (because it contains four thousand additions), and when it’s been reviewed “enough”, you just merge it and all is good. Right?
Nope.
You ship your new feature and you’re expecting fireworks and applauding crowds, because that’s what should follow weeks of hard work. Instead, you start getting hammered on Twitter. Turns out, you didn’t test the new feature properly and the app crashes on 32-bit devices.
This is not based on a true story, but it might as well be. Most of us have been in a team where continuous integration (CI) was not yet a part of their workflow. Maybe they thought they’re still too small to use such “advanced tools” or maybe they just were too busy to get it set up.
Continuous integration is a practice of knowing what you’re merging and merging it often.
This is my own definition of continuous integration. And both pillars of it were broken in the story above. First, the team didn’t know what they were merging (a bug making their app unusable on 32-bit devices). Second, since they didn’t merge often, they ended up with a huge diff that no human being could reasonably review. Both problems could have been prevented, if only they had followed CI practices with a CI tool in place.
If you’re in a situation where your team is not yet using CI, or if you’re already using a continuous integration tool but you aren’t particularly happy with it, this article is for you. Today, I will show you how to get started with a continuous integration server created by Apple called Xcode Server (“XCS” for short).
There are multiple reasons why it’s the go-to solution for all my projects:
- it’s free
- it’s self hosted
- it can test on connected iOS devices
- it supports Over-The-Air (OTA) installation of your apps out of the box
- you’re always in control of its Xcode version (no more waiting for other people to update it for you)
- most importantly, it’s built by the same people who maintain Xcode, meaning you always get support of Xcode’s latest and greatest features like graphs for code coverage, performance test results and others. You can’t beat that.
Today I will show you how to get the basics set up. More articles will follow in this series where I’ll explain how to get tools like CocoaPods (even private pods) in the mix, how to archive Ad Hoc and App Store builds, how to plug in tools like Buildasaur and fastlane or even how to write your own tools against Xcode Server’s API. Basically, I’ll try to show you how to take full advantage of your Xcode Server.
All these will cover how to use Xcode Server. If you’d like to understand how Xcode Server works under the hood, I already wrote an article about that.
Shopping List
In order to follow this tutorial, you will need:
- Mac running OS X 10.10 or higher and Xcode 6 or higher (1x)
- Apple Developer account to access the Developer Portal (1x)
Environment
Even though still in beta, I’ll use Xcode 7 beta 3 and OS X Server 5 beta 3. Most things are very similar in OS X Server 4 and Xcode 6, so having an older version of both should not be a problem (just the exact screens might look ever so slightly different).
Objective of this article
In this article we will install OS X Server on your Mac and enable it with Xcode. Then we’ll create a Bot to test an iOS app, downloaded from GitHub, on Xcode Server. That’s it! Nice and easy, many more parts of this tutorial will follow, where we’ll get closer to a real, more complex iOS dev team setup.
Let’s get started, shall we?
1. Getting OS X Server
Xcode needs OS X Server to be able to run its continuous integration service. OS X Server normally costs $19.99 on the Mac App Store, however iOS and Mac developers can download it for free. Which is exactly what we’ll do now.
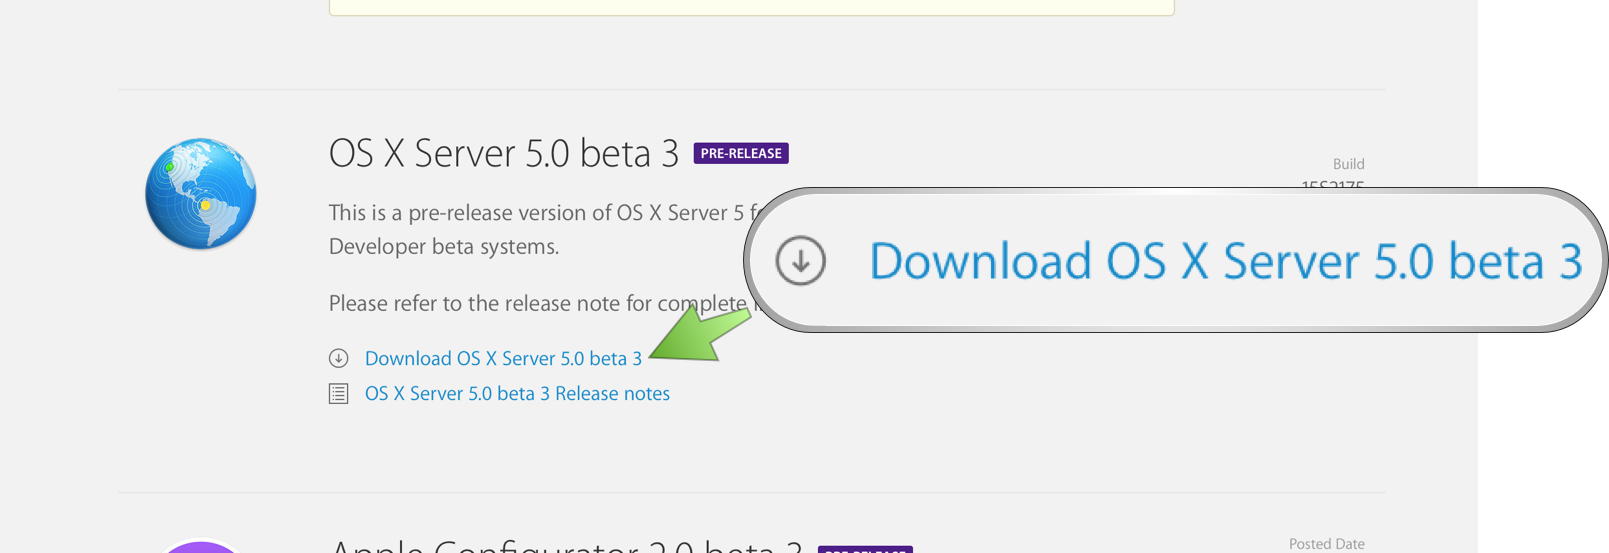
Navigate to this OS X download section of the Developer Portal and download the latest version of OS X Server 5. (You will need to be signed into your developer account.)
Now install OS X Server from the downloaded package.
2. Enabling Xcode Server
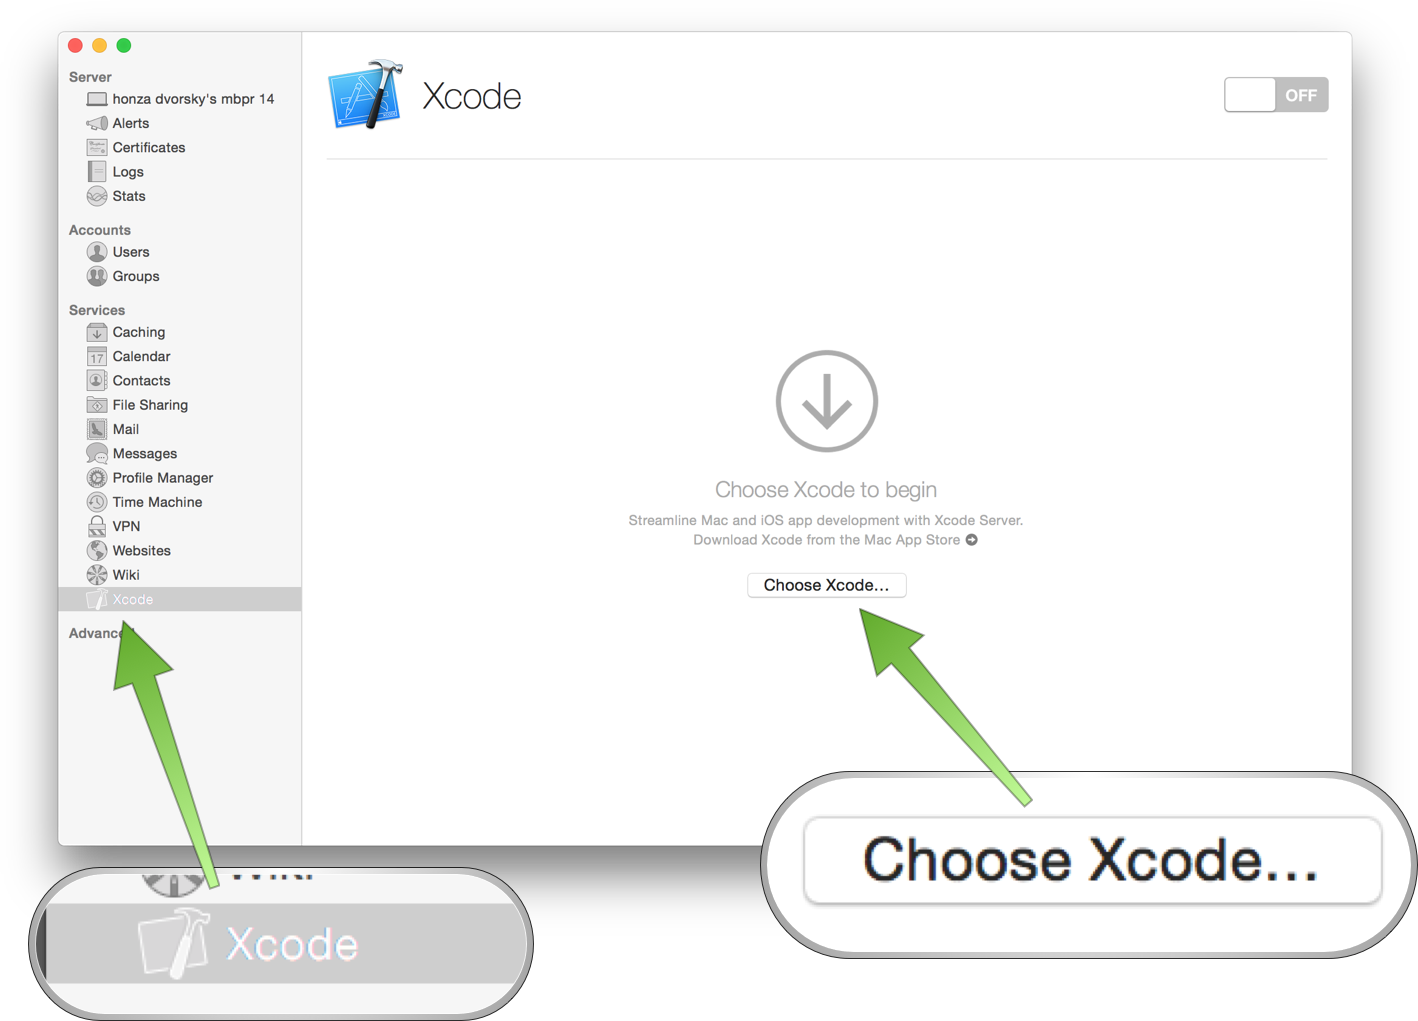
Launch OS X Server (which is just named “Server.app” in your Applications folder) and go to the Xcode Section, under Services.
Then you will need to tell OS X Server which Xcode to use, which you do by clicking “Choose Xcode…” and selecting your Xcode 7 (works with Xcode 6 as well).
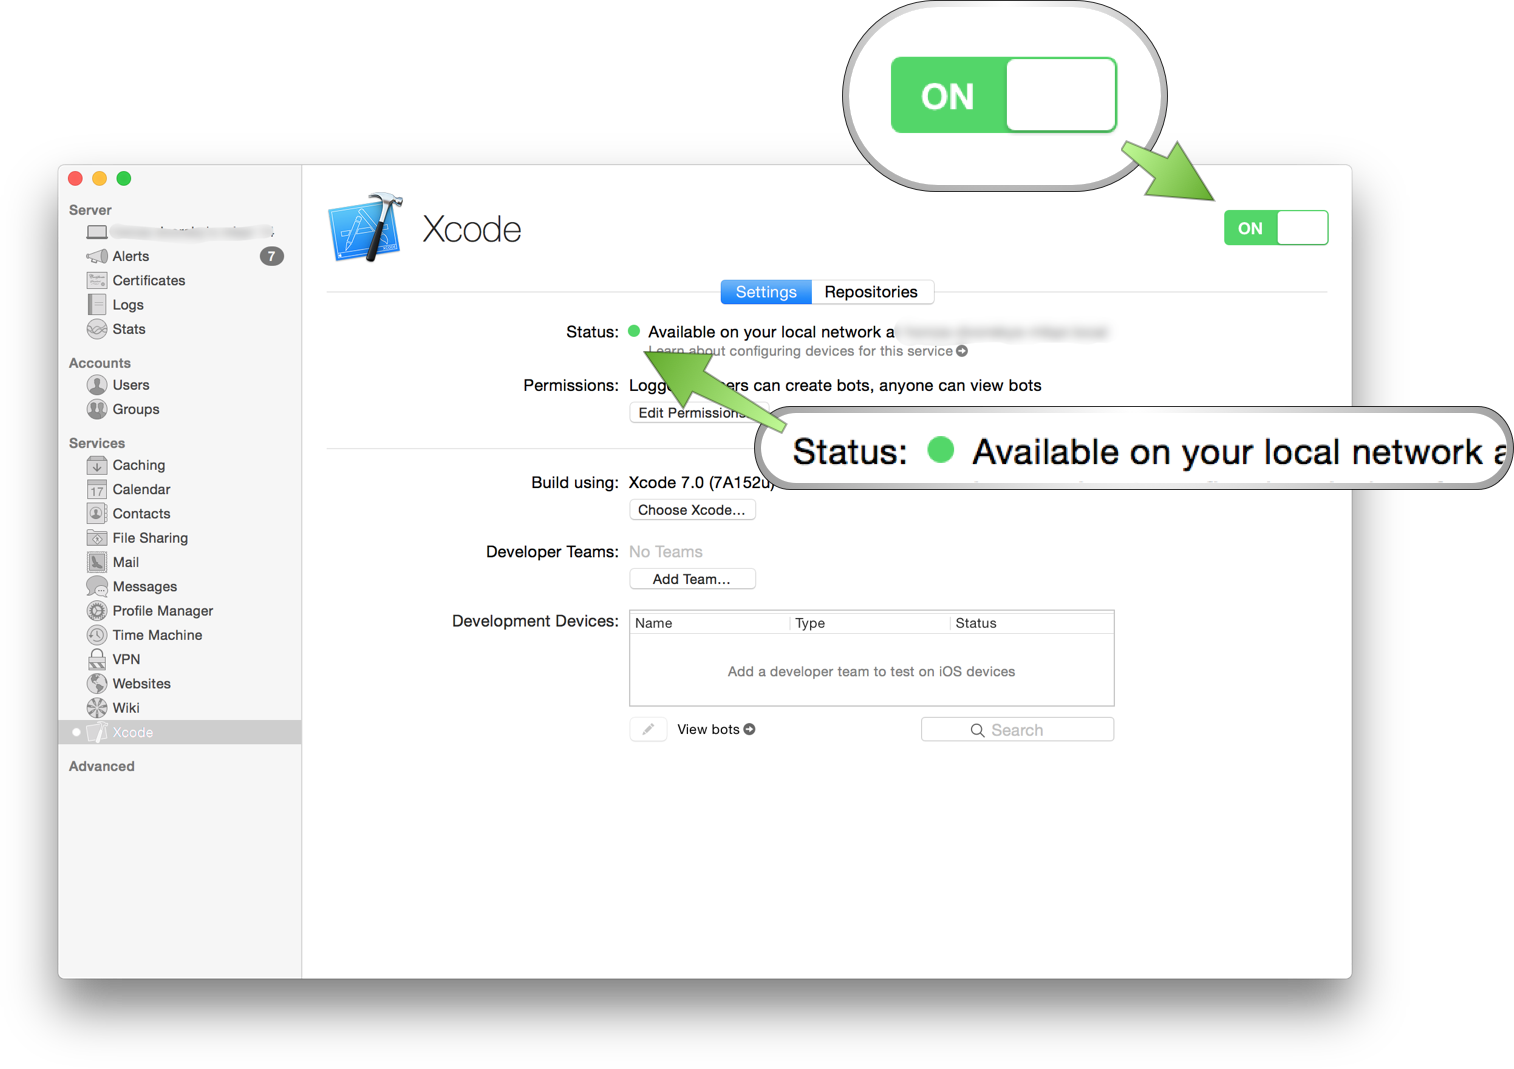
This is followed by about 30 seconds of Xcode Server setting itself up, after which you’ll be able to click the large ON switch at the top right. The status text will change to “Starting” and once everything is up and running, you’ll see a green dot and “Available on your local network…”.
Voila, you just got yourself an Xcode Server! 🎉
3. Checking out our test project
Now we will create a Bot to test an app I put on GitHub for you (am I not nice?). It’s called, as you’d expect, XCSTutorialProject1. It contains an Xcode project with an iOS app target.
One way to create Bots is directly from Xcode. In order to do that, you first need your project checked out locally. Let’s do that now. Open Terminal and in your Documents directory, for example, run the following three commands:
git clone --branch step1 [email protected]:czechboy0/XCSTutorialProject1.git
cd XCSTutorialProject1
open XCSTutorialProject1.xcodeproj
This will clone the project locally (at the first step of the tutorial) and open it in Xcode. Please make sure you’re using the same Xcode you selected for Xcode Server earlier (preferably Xcode 7).
4. Adding server to Xcode
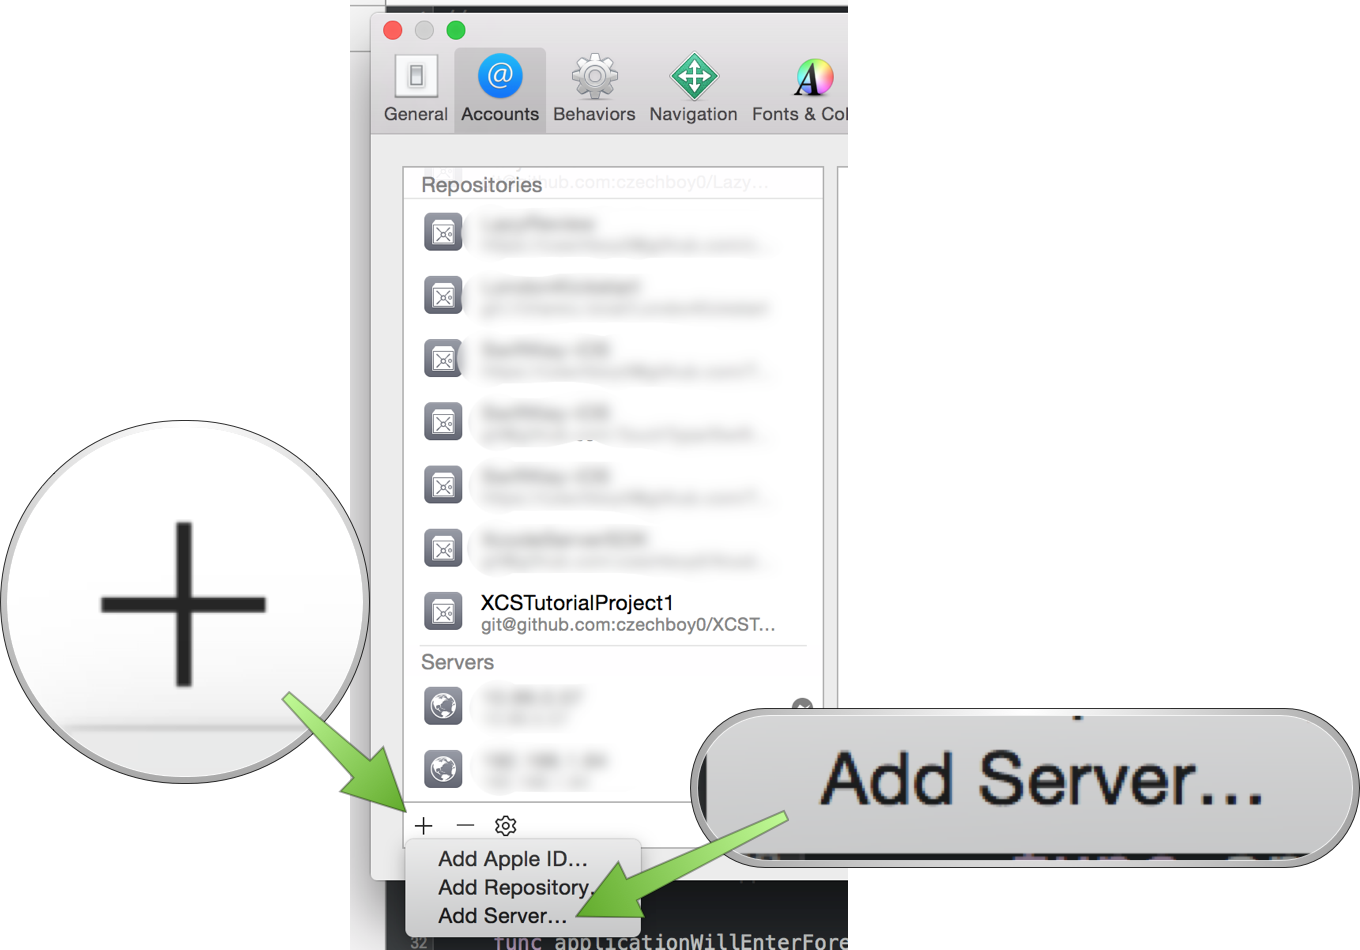
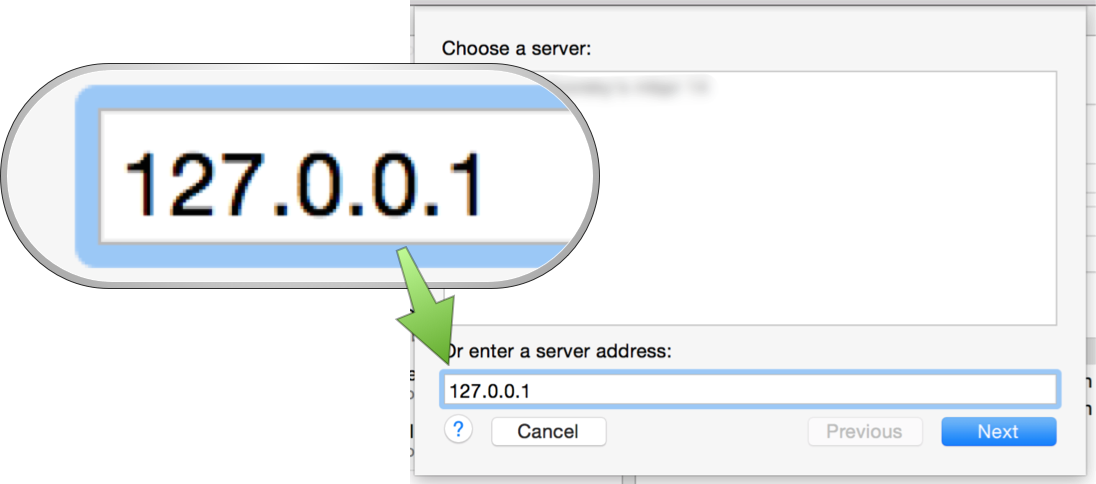
Before we can create Bots, we need to register our newly created Xcode Server with Xcode. To do that, go to Xcode’s Preferences (CMD+,), then “Accounts”, at the bottom hit the little plus button and select “Add Server”.
For the address fill in your localhost (127.0.0.1), because that’s where you installed Xcode Server just a second ago …
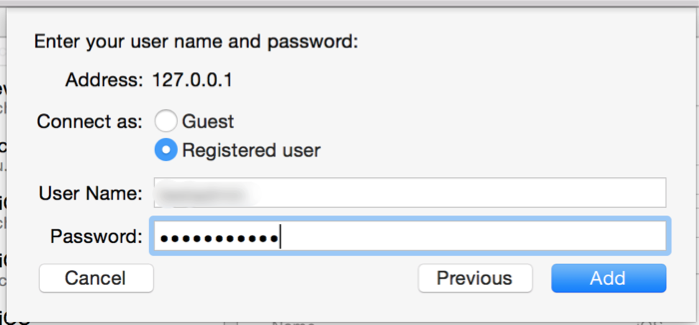
and then your credentials (which will be the same credentials as you use for your normal Mac account, for me that is User Name: honzadvorsky and my login password.)
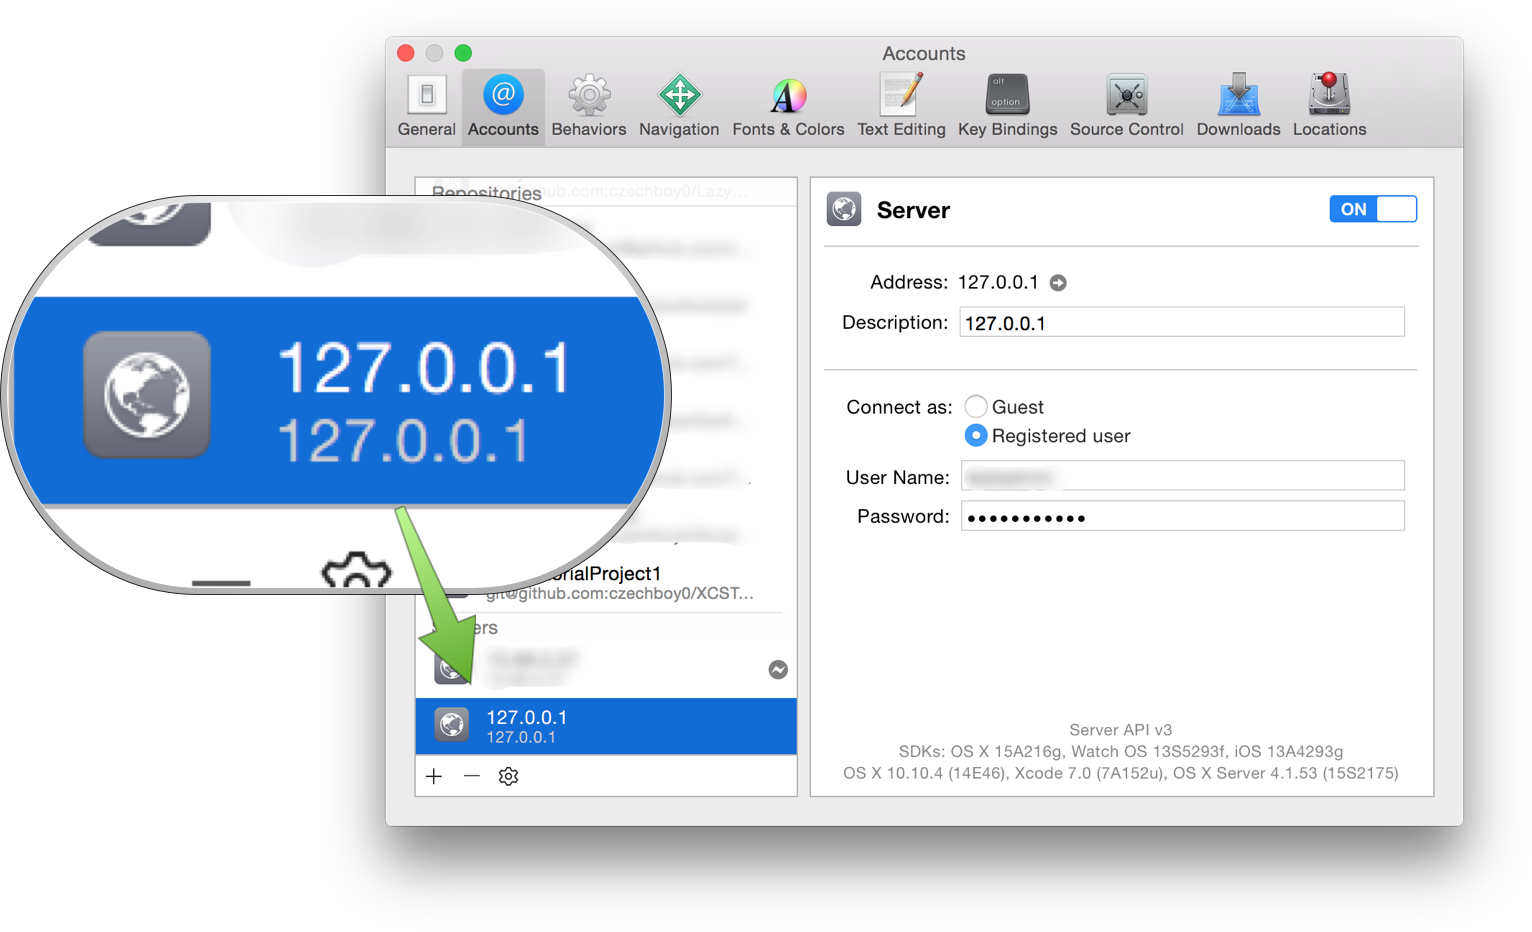
After hitting “Add”, you should see your server added in Xcode’s Preferences.
5. Creating a Bot
I keep talking about Bots, but what are they, really?
Bot, in XCS terminology, is a build job description. It tells Xcode Server where your code lives, how to build and test it, who to notify after a build finishes etc. One run of such a Bot is called an Integration. Integration produces assets, such as archives, IPAs, test results and logs.
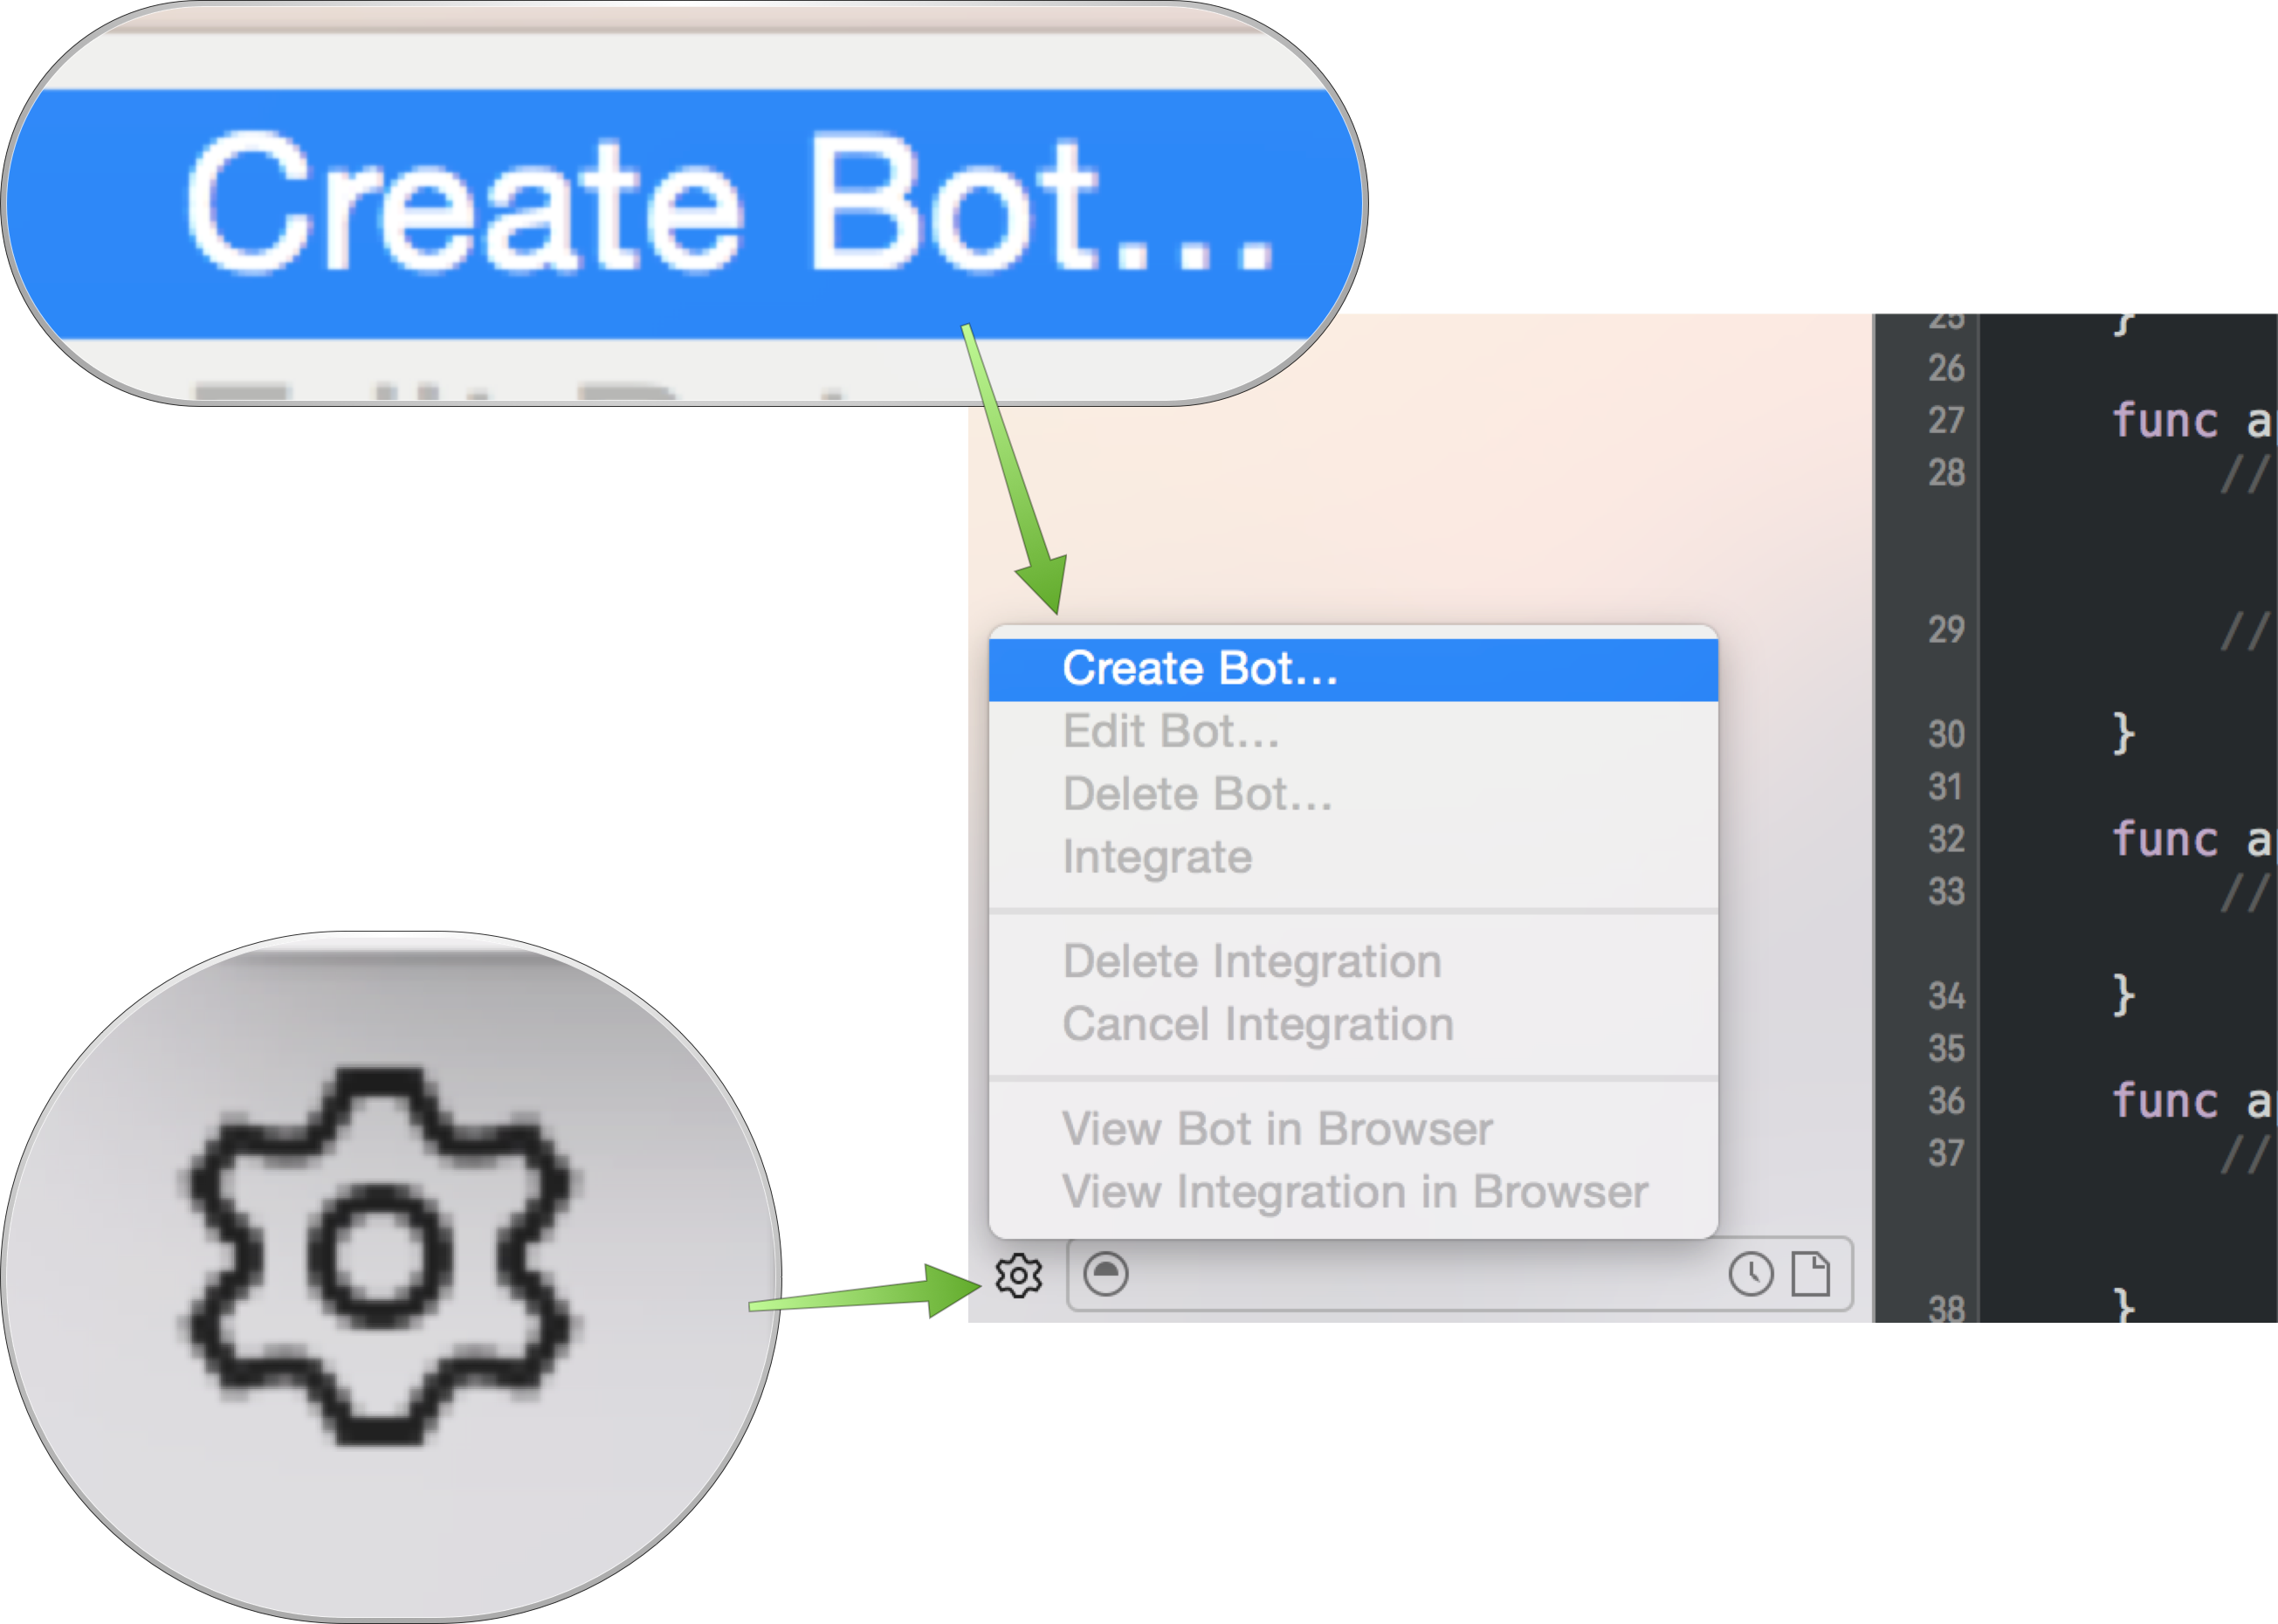
Let’s create our first Bot now. Bot controls are hidden in the Report navigator, which is the last column in the left section of Xcode.
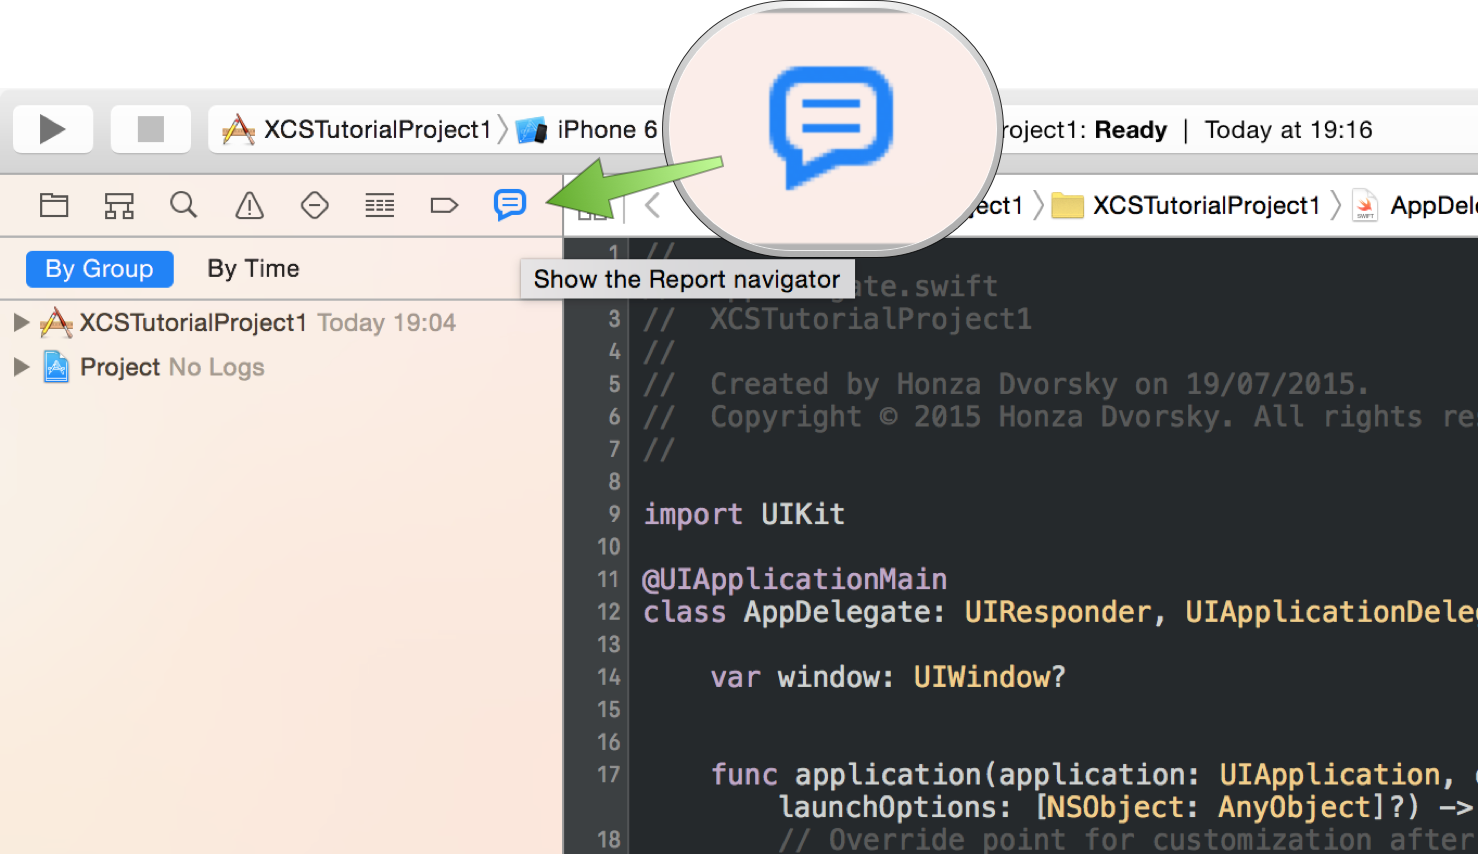
At the very bottom left, click the gear icon and “Create Bot…”.
You should now see a sheet popup similar to the one below. Notice the checkbox asking you to share your scheme.
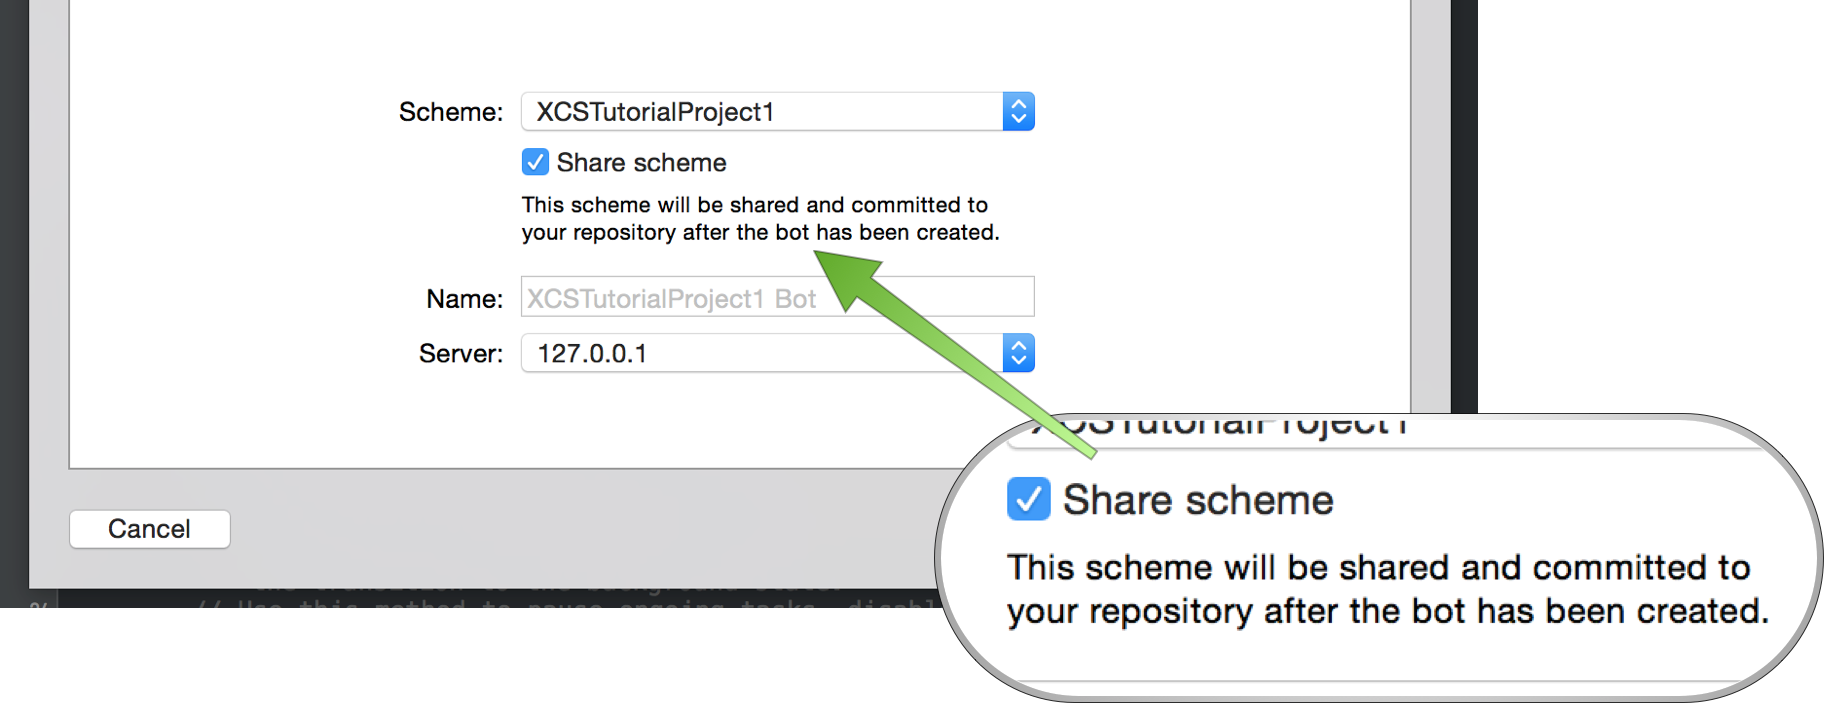
What does this mean?
Schemes are just files in your
xcodeprojandxcworkspacefolders, which describe which target to use (e.g.XCSTutorialProject1 - iOS app) and how it should be built (e.g.DebugvsRelease). Only shared schemes are checked into your repository and only those can be used by CI services, such as Xcode Server.
Basically, a scheme is a build recipe. So we need to make sure Xcode Server can see it, which we achieve by “sharing” it (clicking the Shared tickbox when editing the scheme in Xcode, which in turn adds it to our repository).
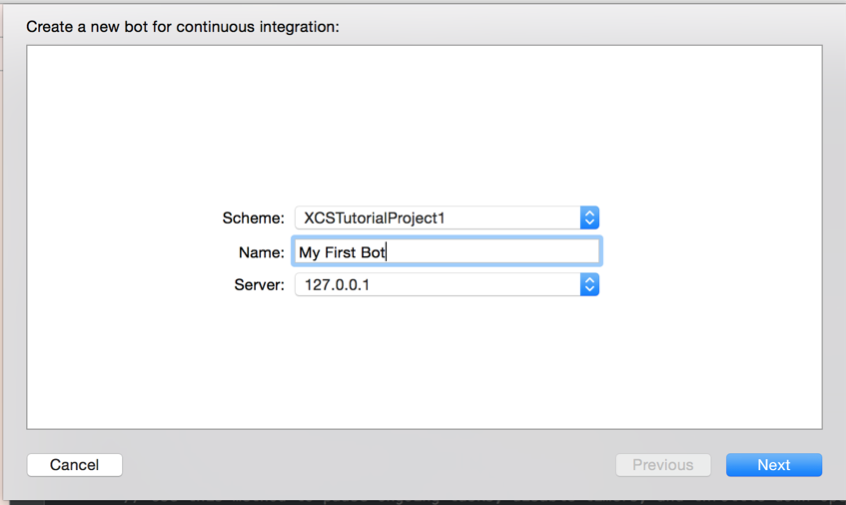
The first time you’re creating a Bot in your project, you will see this. Normally, you’d go ahead and let Xcode commit the scheme into your repository. I have already done that for you. So please hit “Cancel”, switch to Terminal and in your project’s folder run
git checkout step2
Then restart Xcode (sorry, Xcode doesn’t like schemes changing under its hands) and repeat the Bot creation process. This time there should be no message about schemes, like in the screenshot below.
Hit Next, at which point your Xcode will go and check whether it has access rights to your (well, actually, my) repository. Most likely (if you’re using a self-signed certificate on your server, like I am) you will first see Xcode complaining that “The server SSH fingerprint failed to verify.” This is a new security feature in Xcode 7 to prevent MITM attacks. You will need to click “View” and then “Trust”. This means you declare “That’s OK, Xcode, I know and trust this Xcode Server, no need to worry.”
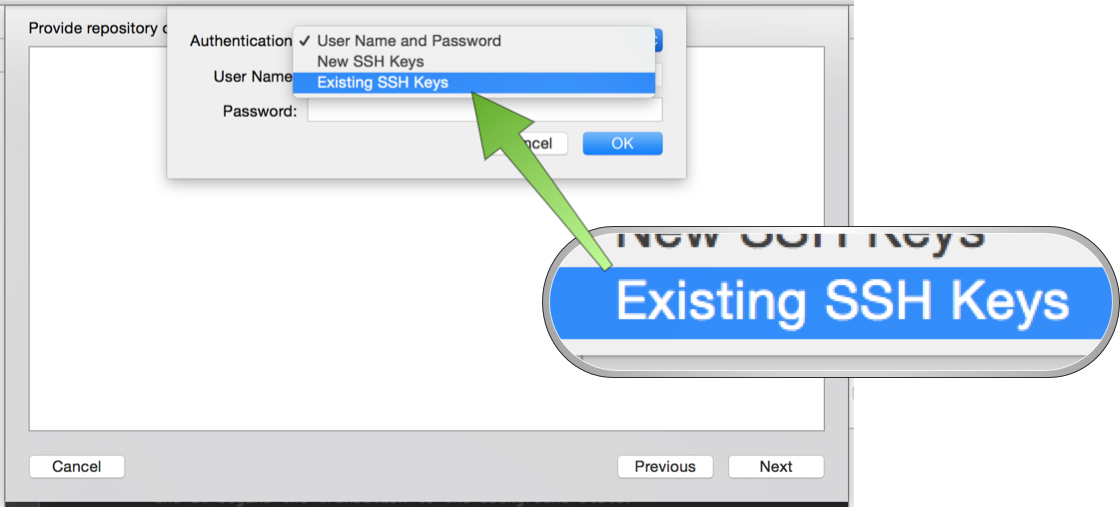
Then, if you haven’t signed into your repository in Xcode’s Preferences -> Accounts, you will be asked to “Sign In” with Xcode saying “Provide credentials so that Xcode Server can check out from this repository.” Click “Sign In” and tell Xcode whether you want to create new SSH keys or use existing ones. Since I already have my SSH keys in ~/.ssh/, I tell Xcode to “Use Existing SSH Keys”.
Assuming you provided Xcode with the correct credentials, you will be able to choose a branch on which your Bot should build your code. Note that whenever you run an Integration, your Bot pulls changes from said branch and builds the latest version of your code. That means that if you’d like to test code on multiple branches, let’s say master and release, you would need to create two separate Bots for them (we will make this process seamless in a later tutorial using Buildasaur).
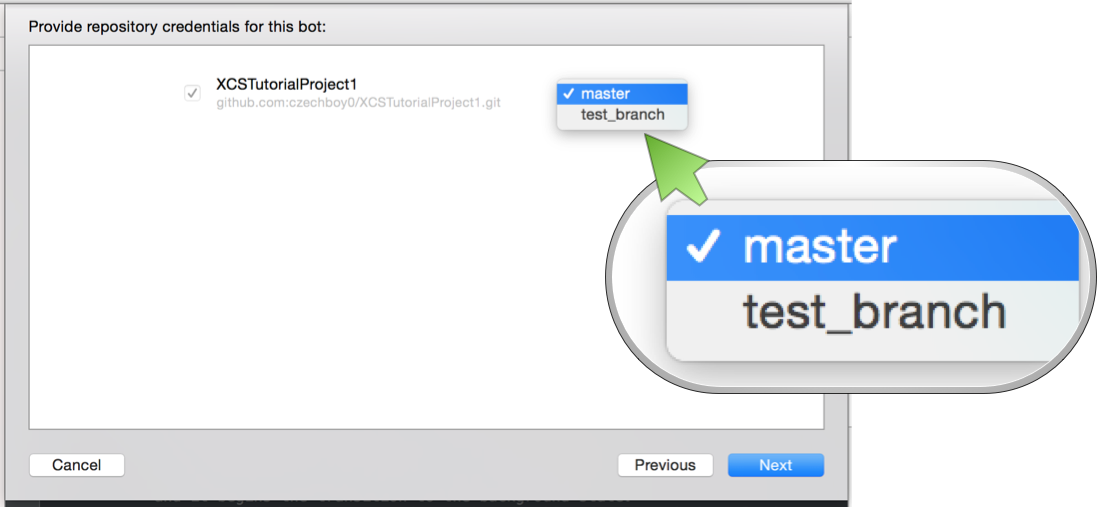
Choose master and click Next. You will be presented with all the various options you can set a Bot up with. Let’s dive into what they all mean! (This might be a good time for a coffee or bathroom break… Nice weather in London now, isn’t it? … crickets … Ok, back to Bots!)
6. Bot Configuration
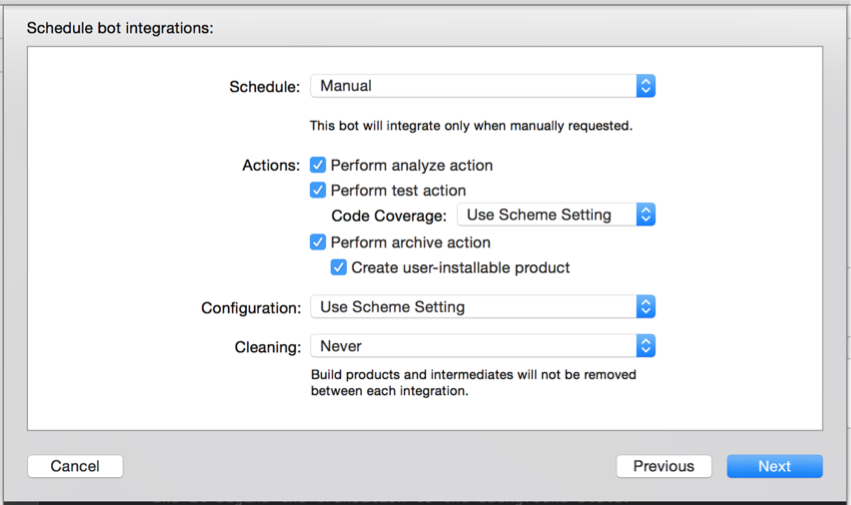
- Schedule tells your Bot when to run:
- Periodical means you can run your Bot hourly, daily or weekly
- On Commit will make your Bot fetch from your repo every 5 minutes and whenever it finds a new commit, a new Integration will be started. Having one of On Commit Bots on your
masterbranch helps you quickly spot when your tests start failing, without everyone on your team having to remember to run tests manually - Manual will only run when you click “Integrate” on your Bot in Xcode
- Actions tell your Bot what to do:
- Perform analyze action runs the static analyzer
- Perform test action runs tests of your app
- Perform archive action archives your app for potential TestFlight or App Store distribution
- Code Coverage allows you to see which of your code is covered by tests - and this option lets you force Xcode Server to gather coverage data without you having that preference turned on in your scheme. This can be useful when you don’t want to gather coverage data when running tests locally, but want to take advantage of it when running on the CI server
- Create user-installable product signs and exports, from your built archive, your app to be directly installable on iOS devices over Wi-Fi - I will describe how you can do this in a future article
- Configuration allows you to override the build configuration (Debug, Release, …) for this Bot. I always leave that to the default, “Use Scheme Setting”.
- Cleaning gives you a chance to make sure your Bot is never relying on a state of
DerivedDataor its source folder by periodically cleaning all of its resources and checking out your repo from scratch. Have you ever had a corruptPodsfolder? This is a way to remove all build products, intermediates and source folder before a new Integration starts (which checks out everything from scratch). The options are:- Always - all build products and intermediates will be removed before every Integration
- Once a day - only the first Integration of the day will start from scratch
- Once a week - only the first Integration of the week will start from scratch
- Never - build products will not be removed automatically
Many options, right? Well, worry not, the default values are usually the right ones. If you don’t change anything, you end up with a decent setup.
Now, please make sure “Perform test action” is checked and hit Next.
⚠️ There seems to be a bug in Xcode 7 Beta 4 where at this point, Xcode crashes. This is not reproducible for all users, but if at this point your Xcode crashed, please install Xcode 7 Beta 5 or newer and use that version instead.
You will be presented with a screen titled “Choose the devices that this bot will test with”, and that’s exactly what we’ll select now. You will notice the top combo box has the value “iOS” and is disabled. This is because the scheme you selected in the beginning tells Xcode Server that we’re building an iOS target.
Test With gives you four options:
- All iOS Devices and Simulators - tests on all connected iOS devices and all Simulators. This can take a while, because there are over 10 simulators per iOS version. If you have two Xcode’s installed, like I do now, that would test for iOS 8.4 and 9.0, over 20 devices. Is fine if your unit tests only take seconds to run, however
- All iOS Devices - all connected iOS devices, no Simulators
- All iOS Simulators - all iOS Simulators, no connected iOS devices
- Specific iOS Devices - specific Simulators and connected iOS devices

Let’s choose the last option, Specific iOS Devices and select three devices to test on. If you connect a development device to your server, it will immediately show up in the same list and you can include it in your testing process (super simple).
Continue with Next and you will arrive at a page called “Configure Bot triggers”.
Trigger is an action that runs before or after each Integration. Xcode Server supports two trigger types: script and send email notification.
With script, you can basically achieve anything: run pod install or a fastlane lane, or even notify your Slack group when the build is done.
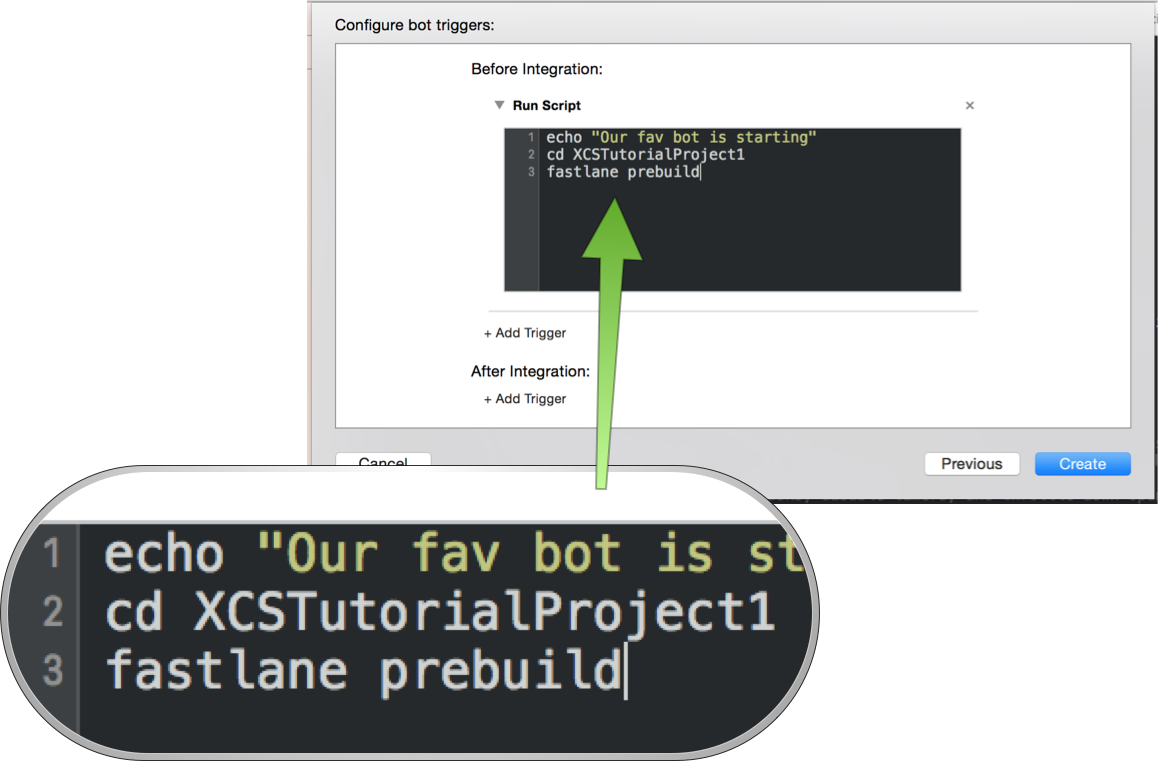
⚠️ Weirdness Alert - there is one thing that always trips people up. When Xcode Server checks out your repo, it doesn’t cd into the enclosing folder (just like when you run git clone ... locally, then you need to cd into your project). Thus the first thing in your script needs to be cd PROJECT_NAME (in our case that would be cd XCSTutorialProject1). Then you can run pod install or fastlane.
The second trigger type is send email notification, which does exactly what you’d expect. It sends you an email when an Integration finishes. It’s smarter than that, however. It can send emails to all committers, because it knows who committed code since the last Integration. This way, only the people responsible for the code changes will be notified. If you’d like certain email address to always receive these emails, you can add those as well.
You can also customize the logic to only email you when an Integration fails and you’re in control of what gets included in these emails. Neat!
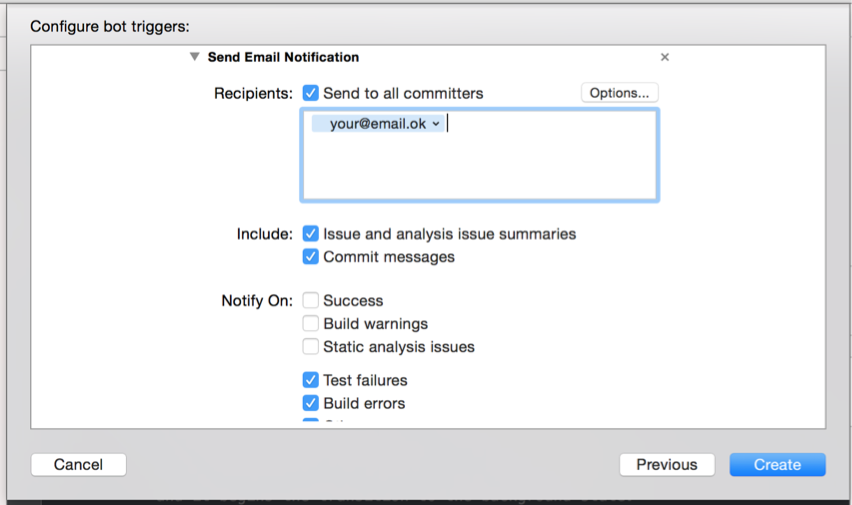
Create one of these email notifications and add your email address. However, please uncheck the Send to all committers box in your Bot, otherwise I will get an email for your finished Integrations :) (Because I’m the author of those commits.) This is one of the funny parts of Xcode Server - its emailing system was not designed for open source projects.
Once you hit “Create”, you should see that you succeeded at your quest for creating your first Bot!
Congratulations! You just created your first Bot! 🎉
Curious what you just did? And what happens next? Check out Part 2, where we’re taking a good look at your Integration results!
I hope you found this useful or interesting. For criticism, praise and future articles, I’m @czechboy0.dev on Bluesky.