21. October 2015
This article is Part 4 of a whole series called Xcode Server Tutorials. Check out Part 3 first if you haven't already. New posts are always tweeted by me (@czechboy0.dev) on Bluesky.
Welcome back! Today we’ll cover the last piece of making Xcode Server a viable CI tool for shipping apps: code signing. Code signing is an important part of the outstanding security of iOS, Mac, Watch and now TV apps on Apple’s platforms. However, managing code signing is still an involved process for beginners, even though Apple has been working hard to abstract away many of the details with recent releases of Xcode. Unfortunately, those improvements haven’t really trickled down to Xcode Server yet, so we’ll need to get our hands dirty to make it archive apps for us and let us test on real iOS devices. Shall we?
Objective of this article
We will add a connected iOS device as a test device, which will require us to tackle code signing of our app with a development provisioning profile. This won’t be enough for us, because after an app is tested and ready, we want to ship it! This will bring us to archiving our app for testing on TestFlight or deployment to the App Store. Not there yet? We’ll also see how to install our apps on our device over Wi-Fi directly from Xcode Server. During this whole process we’ll make a good use of sigh, a great tool from the fastlane family, so make sure to install that first.
Environment
Xcode 7 has been released, but since my iPhone is on iOS 9.1 Beta, I’ll use Xcode 7.1 Beta 3 and OS X Server 5 in this tutorial. But feel free to use the latest stable Xcode 7. Everything is running on OS X 10.11 El Capitan now.
Project setup
I’ll be working on our XCSTutorialProject1 that you got familiar with in my previous posts, but today you’ll have to make changes to your own Xcode project, because the sample project’s app ID cannot be registered under all of us. Whenever you’re not sure about something, however, feel free to take a look in the sample repo (and choose the right branch - today we’ll use step5).
How to use code signing in Xcode is out of scope of this article, but I recommend this quick guide on code signing with fastlane, because that’s what we’ll set up today. Unfortunately, we won’t be able to use the “Best Solution” mentioned in that article (using environment variables), because as far as I can tell, there is no way to pass environment variables to Xcode Server’s build command. Thus we’ll use the last solution where we’ll let fastlane download our provisioning profiles, change them in our project and we’ll save them in git, to be later copied on Xcode Server.
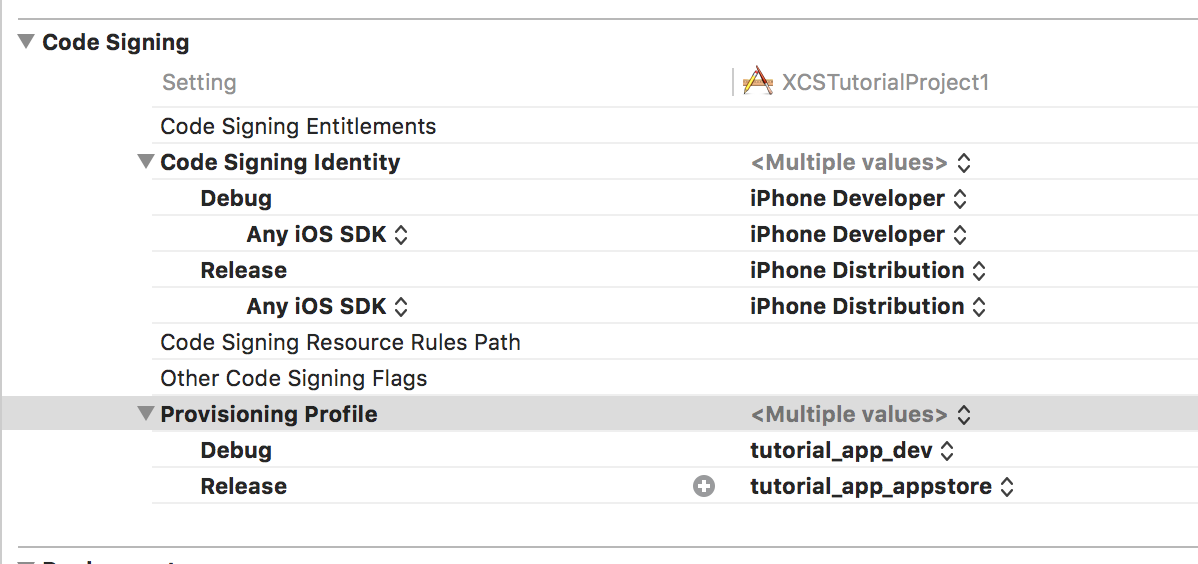
This means that we will not be using the automatically managed provisioning profiles in Xcode. If you want to have a good setup with Xcode Server that includes archiving apps for distribution, I recommend you switch to manually managed profiles, like I have in the sample project.
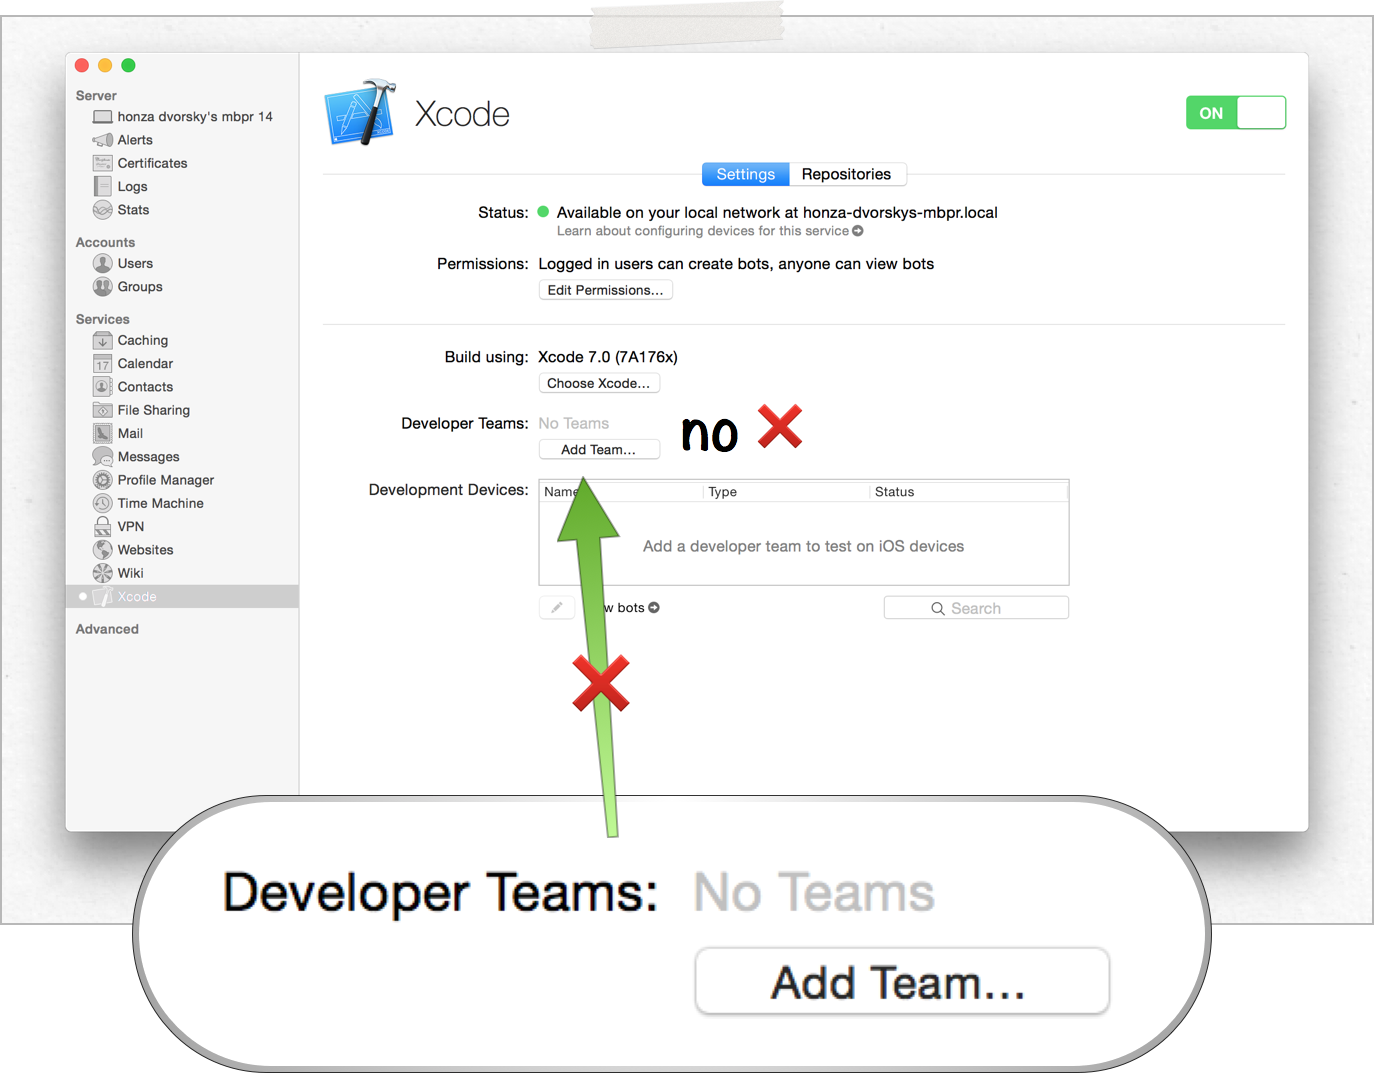
⚠️ Again, you might be tempted to use the button titled “Add Team…” in Xcode Server’s configuration screen in OS X Server. DO NOT do that. That would create a new certificate for the server, which you can only add to the automatic provisioning profiles (which you can’t use for archiving apps for distribution) and is very difficult to clean up later.
TL;DR? Too much magic that doesn’t lead to the right results.
1. Provisioning Profiles
Ok, let’s get back to how we will set things up today. In order to allow Xcode Server to build, test and archive for both testing and distribution, we need to somehow ensure that the respective provisioning profiles are available there. The folder which Xcode Server scans for provisioning profiles is, as you’d expect,
/Library/Developer/XcodeServer/ProvisioningProfiles
and that’s where we need to ensure our profiles are before each build.
As I said, I’ll walk you through a workflow which has worked for me very well, but in no way it’s the only possible one. With that disclaimer out of the way, I tried many ways to do this and this is the least painful one.
1.1 Storing Provisioning Profiles in your repo
The best way to get your profiles over is by actually storing them in your source repository. You don’t have to worry about security here, because provisioning profiles are useless to anyone without your certificate (and a private key). So let’s do that.
As I mentioned in the beginning of this article, we’ll use sigh, a tool from the fastlane family to achieve this by adding a new lane to our Fastfile, which we’ll call provision. For my project it looks like this:
Don’t let the 45 lines of code fool you, it’s not complicated. I just tried to write in in a readable way. Basically, at the top (lines 3-9), we’re just telling sigh who we are and where we want to store the downloaded provisioning profiles. Then, on line 12, we make sure we have a folder called ProvisioningProfiles in our repository. And then, on lines 15-28 we first call sigh, which downloads (and creates if necessary) the appropriate provisioning profile for development (note the development: true on line 21). And we repeat the same thing for the appstore provisioning profile, this time with no development flag.
You add this to your Fastfile and then just run fastlane provision whenever your provisioning profiles might have changed (new team member, new device added to the profile etc.) This will download the provisioning profiles into your repository, in the ProvisioningProfiles folder and modifies your Xcode project to use them in the app target. Needless to say, you need to adapt this lane to work for your project/target/configuration names, but I hope the example is self-explanatory.
After you run fastlane provision, make sure to commit your changes. This is a requirement so that we can go to the next step, using these profiles on Xcode Server.
1.2 Copying Provisioning Profiles on Xcode Server
We just made sure that all our provisioning profiles are stored in our repository, but how do we make sure they appear in
/Library/Developer/XcodeServer/ProvisioningProfiles
on our Xcode Server? Well, we’ll use our prebuild scripts again, just like we did in the previous tutorial.
Luckily, we already have a prebuild lane in our Fastfile, which our Bot calls before every build. Currently, we just install our CocoaPods there, but there’s nothing preventing us from adding more actions to it. So that’s exactly what we’ll do now. As I mentioned multiple times, all we need to do is copy the provisioning profiles from our repository to the right folder on Xcode Server.
sh "cd .. && cp ./ProvisioningProfiles/* /Library/Developer/XcodeServer/ProvisioningProfiles/"
That’s it! Just add this to the lane called prebuild and you should end up with a lane like this.
Let’s give our new setup a whirl! (Spoiler alert: we’re not done!)
2. Testing on your iPhone
You might remember that in Part 1 we created our first Bot. In that process, one screen allowed us to select devices and simulators to test our app on. I asked you to select only simulators back then, but now it’s time to unleash the full power of tests. If you’re wondering why you’d want to test on real devices instead of just simulators, take a look at this post. Also, in my experience at SwiftKey (where we only tested on real devices), there are enough performance, memory and behavioral differences that justify running tests on real devices.
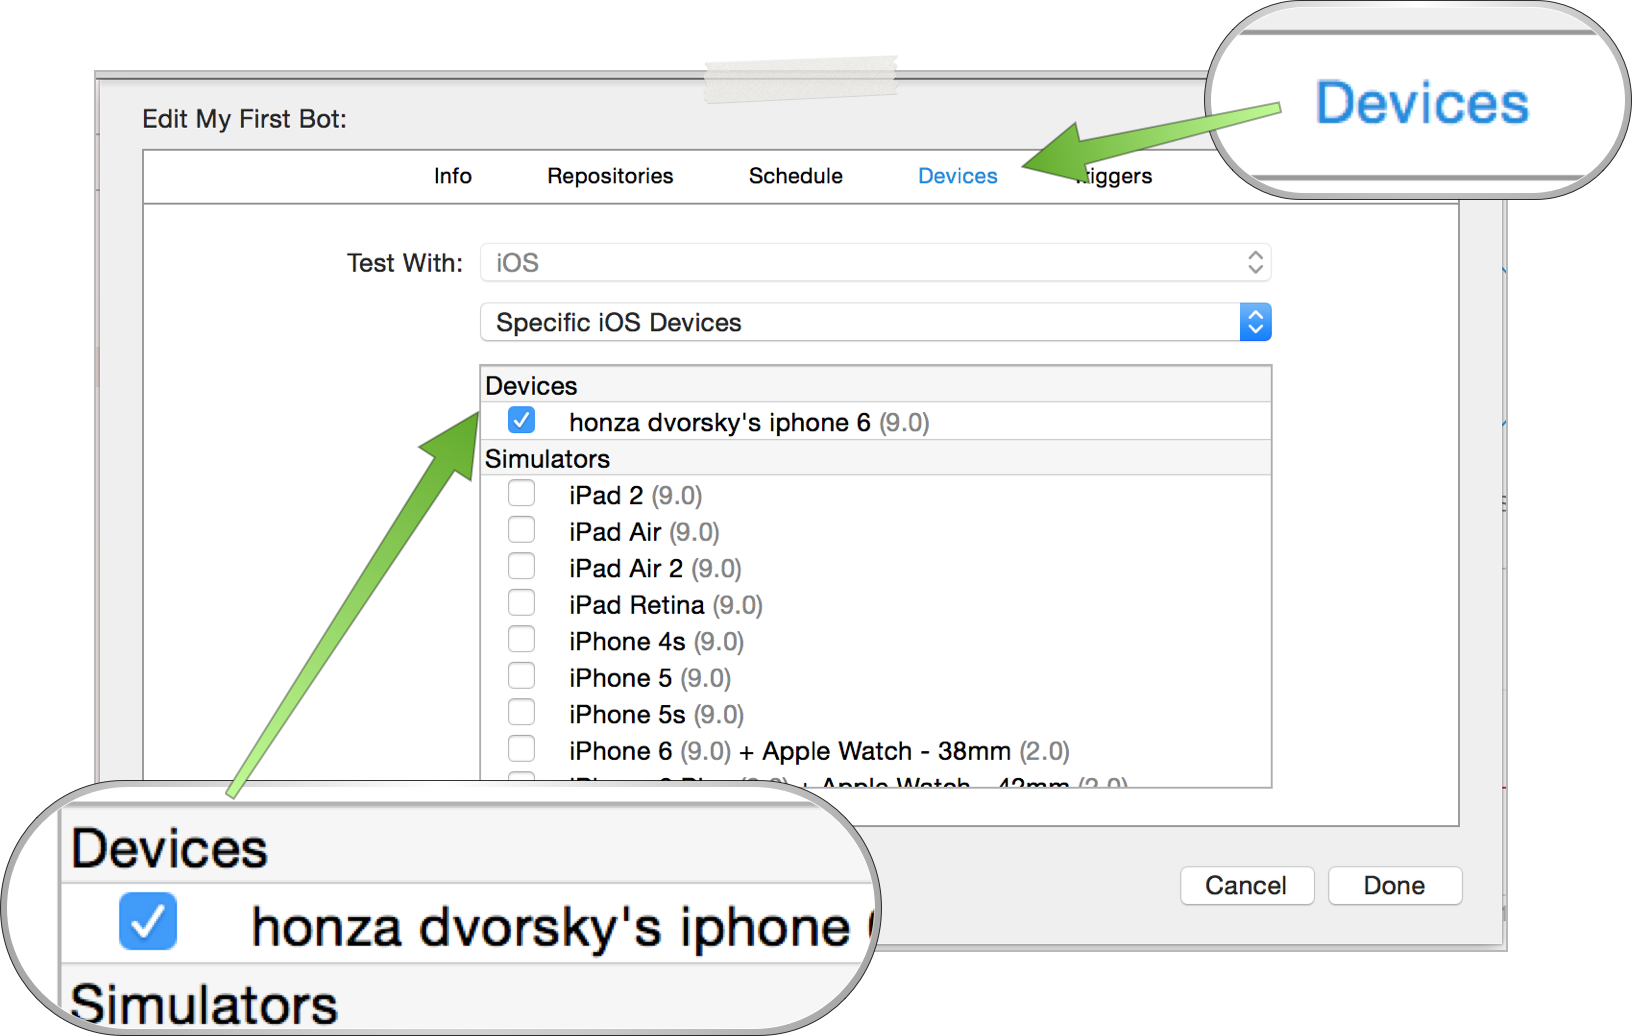
Let’s use our usual approach - try to add our device and see what happens. You already know how to edit your Bot from the previous article, so in the Schedule tab only select the Test action and then switch to the Devices tab. Have a development iOS device handy and connect it to your Xcode Server now. You should see it pop up in the list in a matter of seconds (if it doesn’t, running sudo xcrun xcscontrol –restart to restart Xcode Server has fixed it for me).
Save your Bot and re-Integrate. You might be rightfully suspicious - this will not work yet, but let’s look at the error we got.
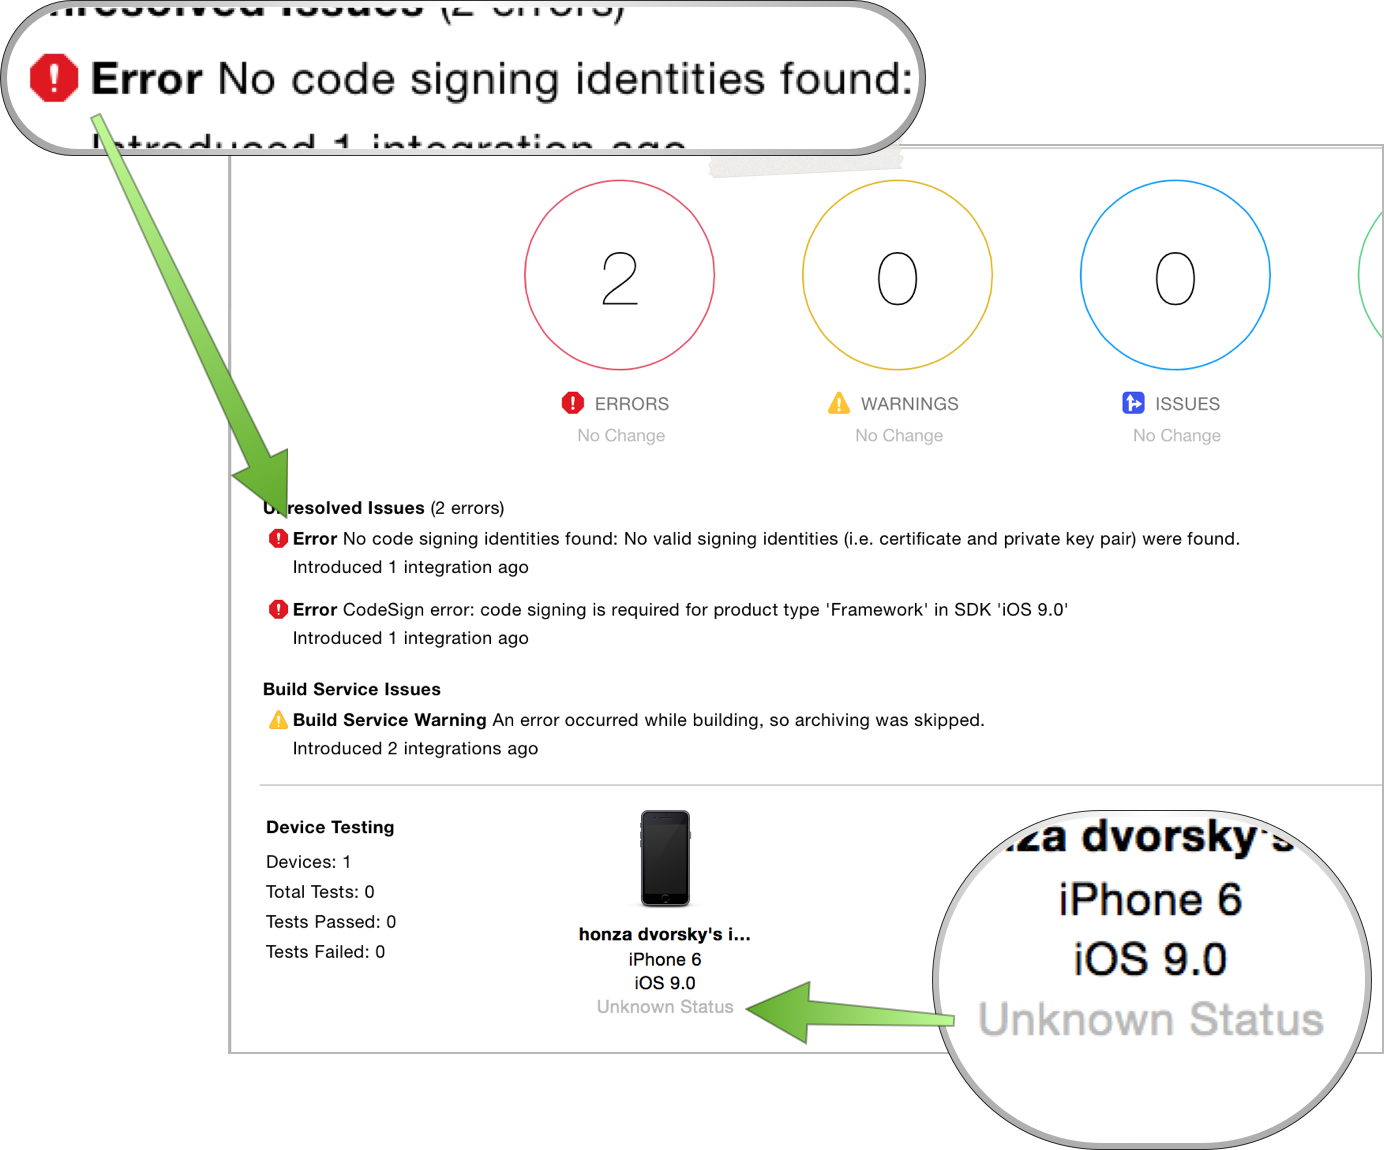
Fair enough - “No code signing identities found” is a pretty sensible error. We are trying to run our app on a real iPhone without providing all the required resources to code sign our app. So why did it work on the Simulator? Well, because code signing is optional for testing on the Simulator, so in our case, Xcode just fell back to not code signing the app before testing, which works just fine. However, that’s not enough for testing on real iOS devices.
That missing resource is called a certificate - and that’s what we’ll fix now.
3. Certificates
Just provisioning profiles are useless without a proper signing certificate. In order to allow our Xcode Server to sign apps for testing on devices and archiving, we first need to have a certificate ready there (which is a piece of crypthographic data proving that it was you who created this app and nobody else). From my experience, I would recommend you transfer both your distribution and development certificates to the server, instead of creating new ones. Let’s look at how we do that!
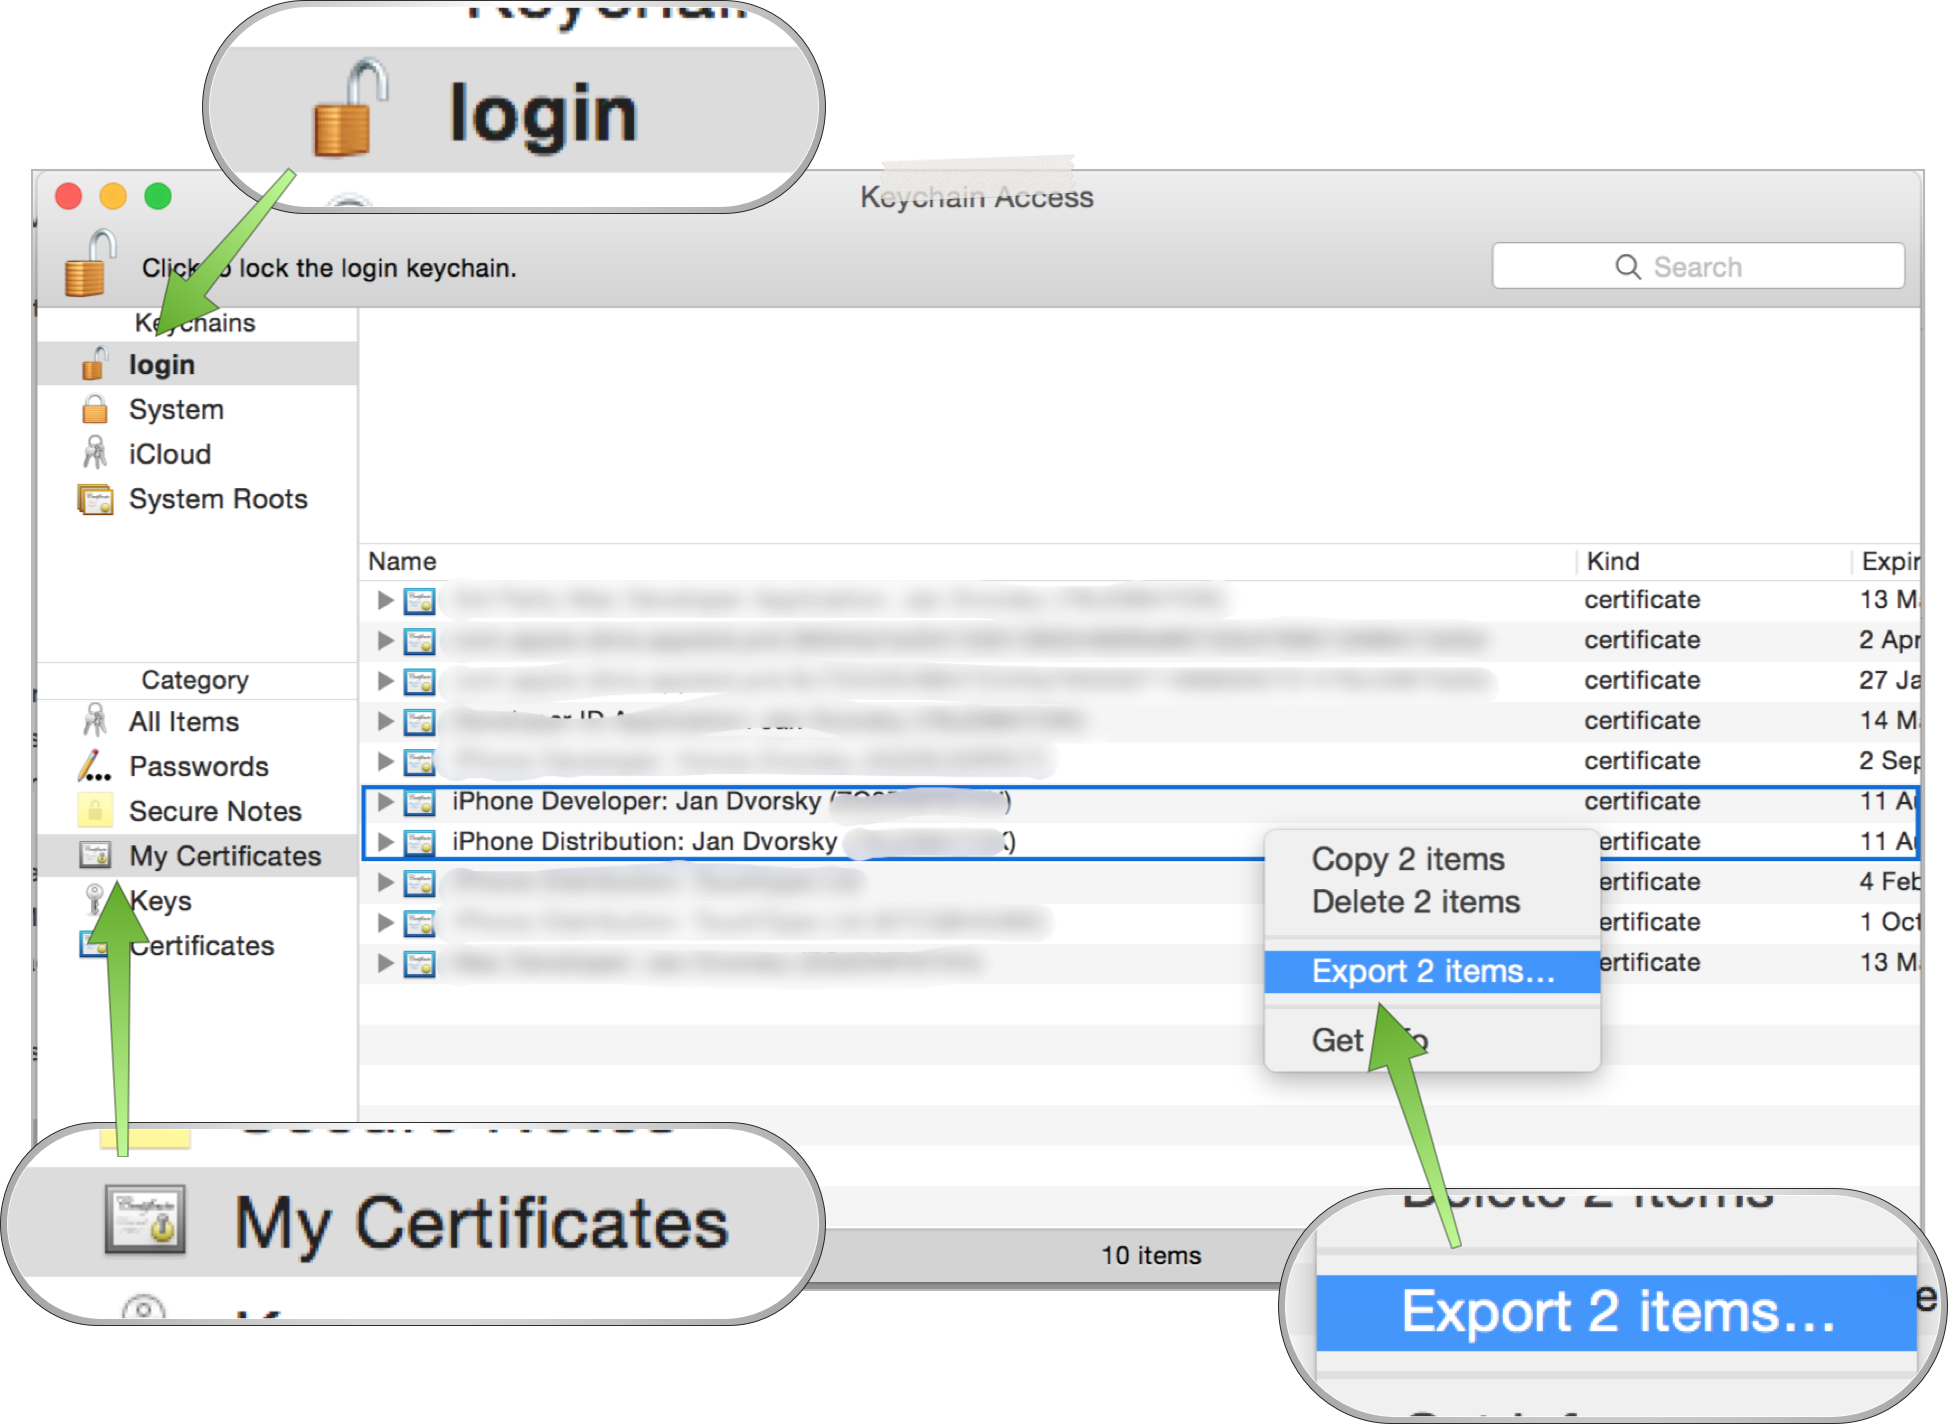
Your certificates need their private keys to be useful for code signing. Both are stored in your OS X Keychain. Open Keychain Access
open "/Applications/Utilities/Keychain Access.app"
and switch to your login keychain at the top left. Then, under Category choose My Certificates. Choose both your development and distribution certificates, right click and select “Export 2 Items…”. Export the certificates (with their private keys inside) as a secure .p12 container and set up a password for the file.
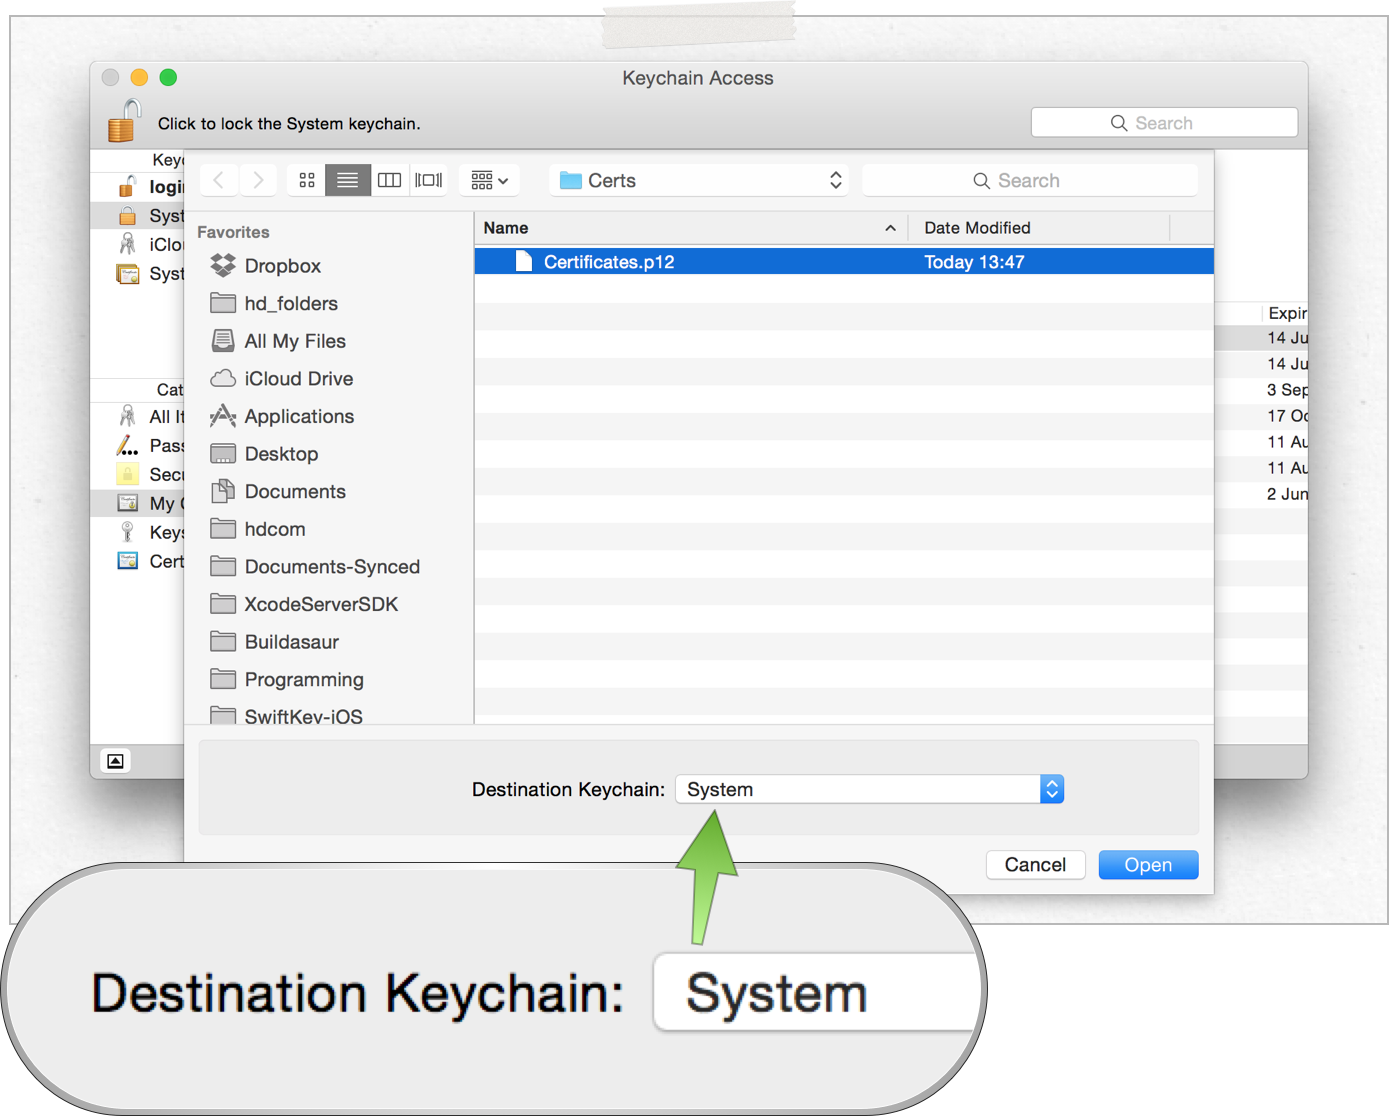
Now send this file over to your Xcode Server machine (or add it to your repo, in which case make sure to keep your password safe), where you’ll open Keychain Access as well. Now, this time, however, switch to the System keychain (that’s the one that _xcsbuildd can actually look into for certificates) and go to File -> Import Items…. Select the .p12 file you just transfered from your development Mac and make sure you’re importing the certificates into the System keychain. Go through the process, type your passwords when asked and at the end you should see your two new certificates appear in the System keychain.
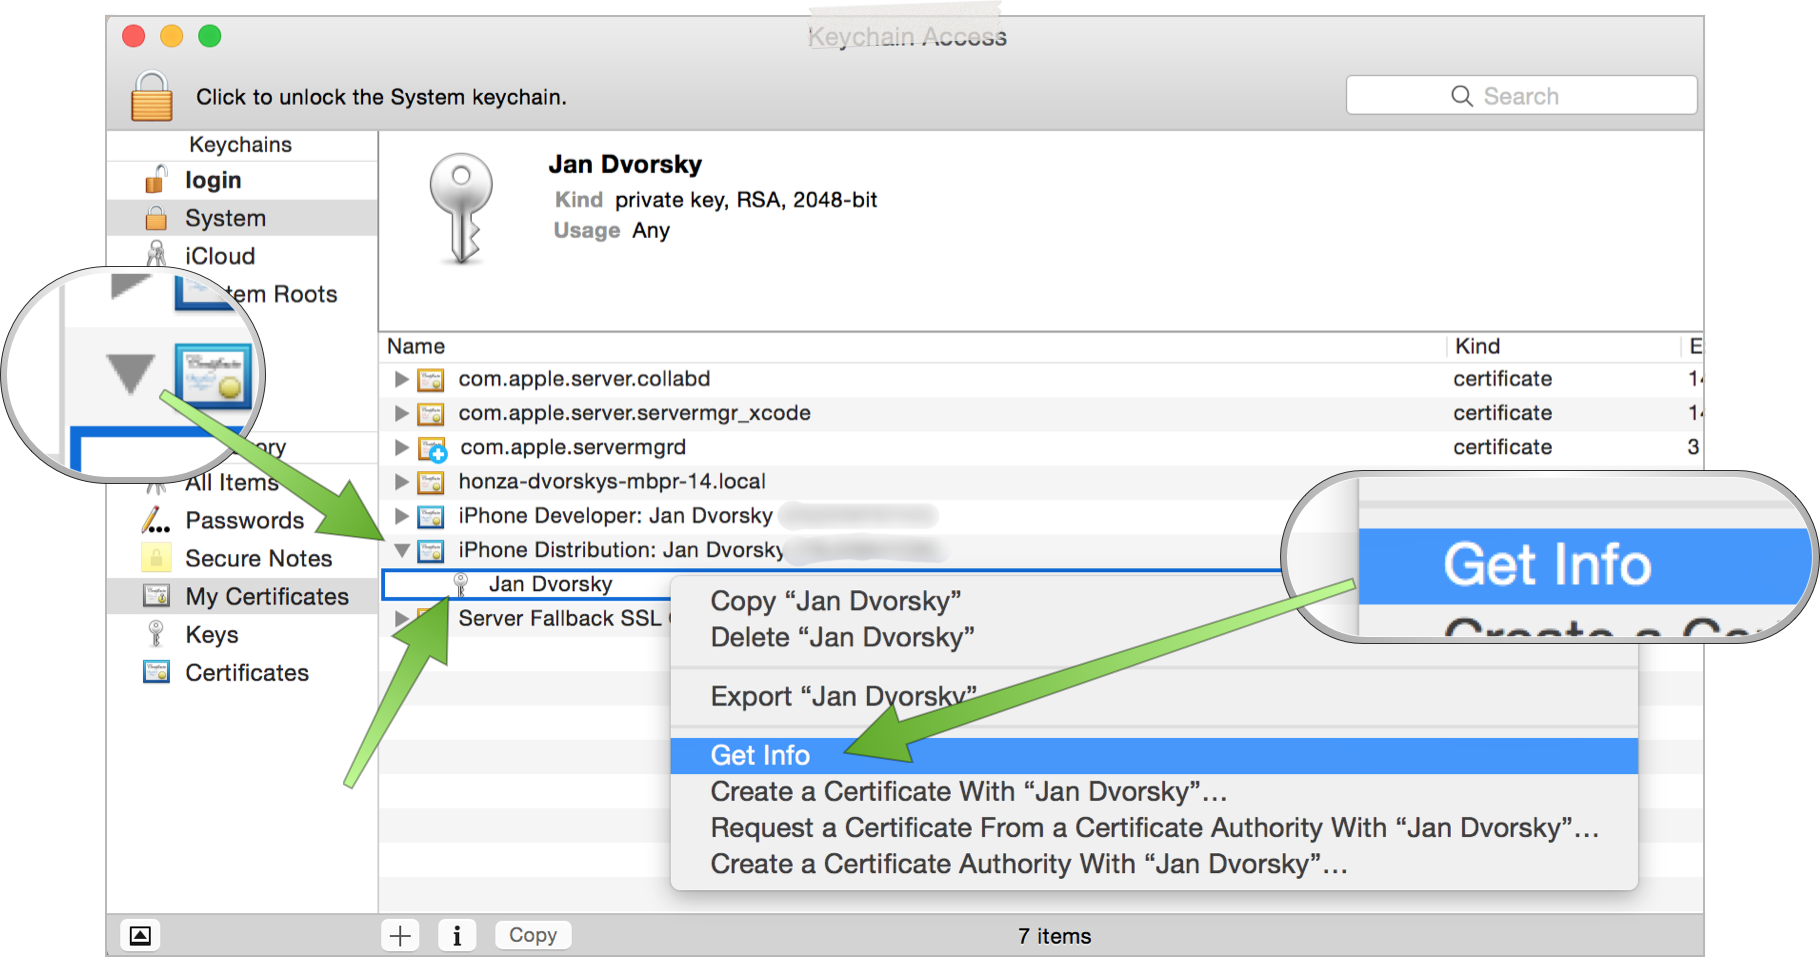
One more thing you have to do to be done with certificates, however. By default, the private keys we just added to our build machine’s System keychain are not readable by /usr/bin/codesign. We easily fix that by expanding the certificate to show the private key inside, right-clicking on the key and selecting Get info. There, switch to Access Control and click on the little plus sign at the bottom left.
This will present you with a file selection dialog, where you’ll need to select /usr/bin/codesign. How do you show hidden files in this dialog, however? CMD+SHIFT+.. Then go to the root of your hard drive and find usr, inside it bin and finally codesign. After hitting Add, make sure to click on Save changes on the bottom right.

What if we didn’t do this? Well, from my experience, you’d probably get your build hanging on trying to sign your code. And then it would time out after a couple of minutes. So if you’re seeing that, make sure your private keys are accessible by codesign.
Now, your certificates are ready to be used. 👍
4. Putting it all together
Let’s recap - we set up our provisioning profiles to be copied from our repository before every build and we just made sure our Xcode Server has access to our certificates that we just transfered there. What’s left? Nothing!
Give it a try, kick off an integration on your Bot and observe how your connected iOS device comes alive, runs tests and the integration succeeds! 🎉 (Make sure your device is unlocked/has no passcode.)
Disclaimer: When upgrading my Xcode Server on an old machine, I had to wipe Xcode Server there before I got this working. This hopefully won’t be necessary for you, but if it’s not working (most likely hanging on tests) and you’ve made sure you followed all the steps above, please resort to resetting your Xcode Server as I described in a hack article focused on xcscontrol.
5. Archiving
Since we did all the hard work already, our distribution certificate and provisioning profile are where they need to be, adding the archiving step in your Bot is all you need to do! So again, edit your Bot, go to Schedule and select Perform Archive action, together with Create user-installable product. Re-run your Bot.
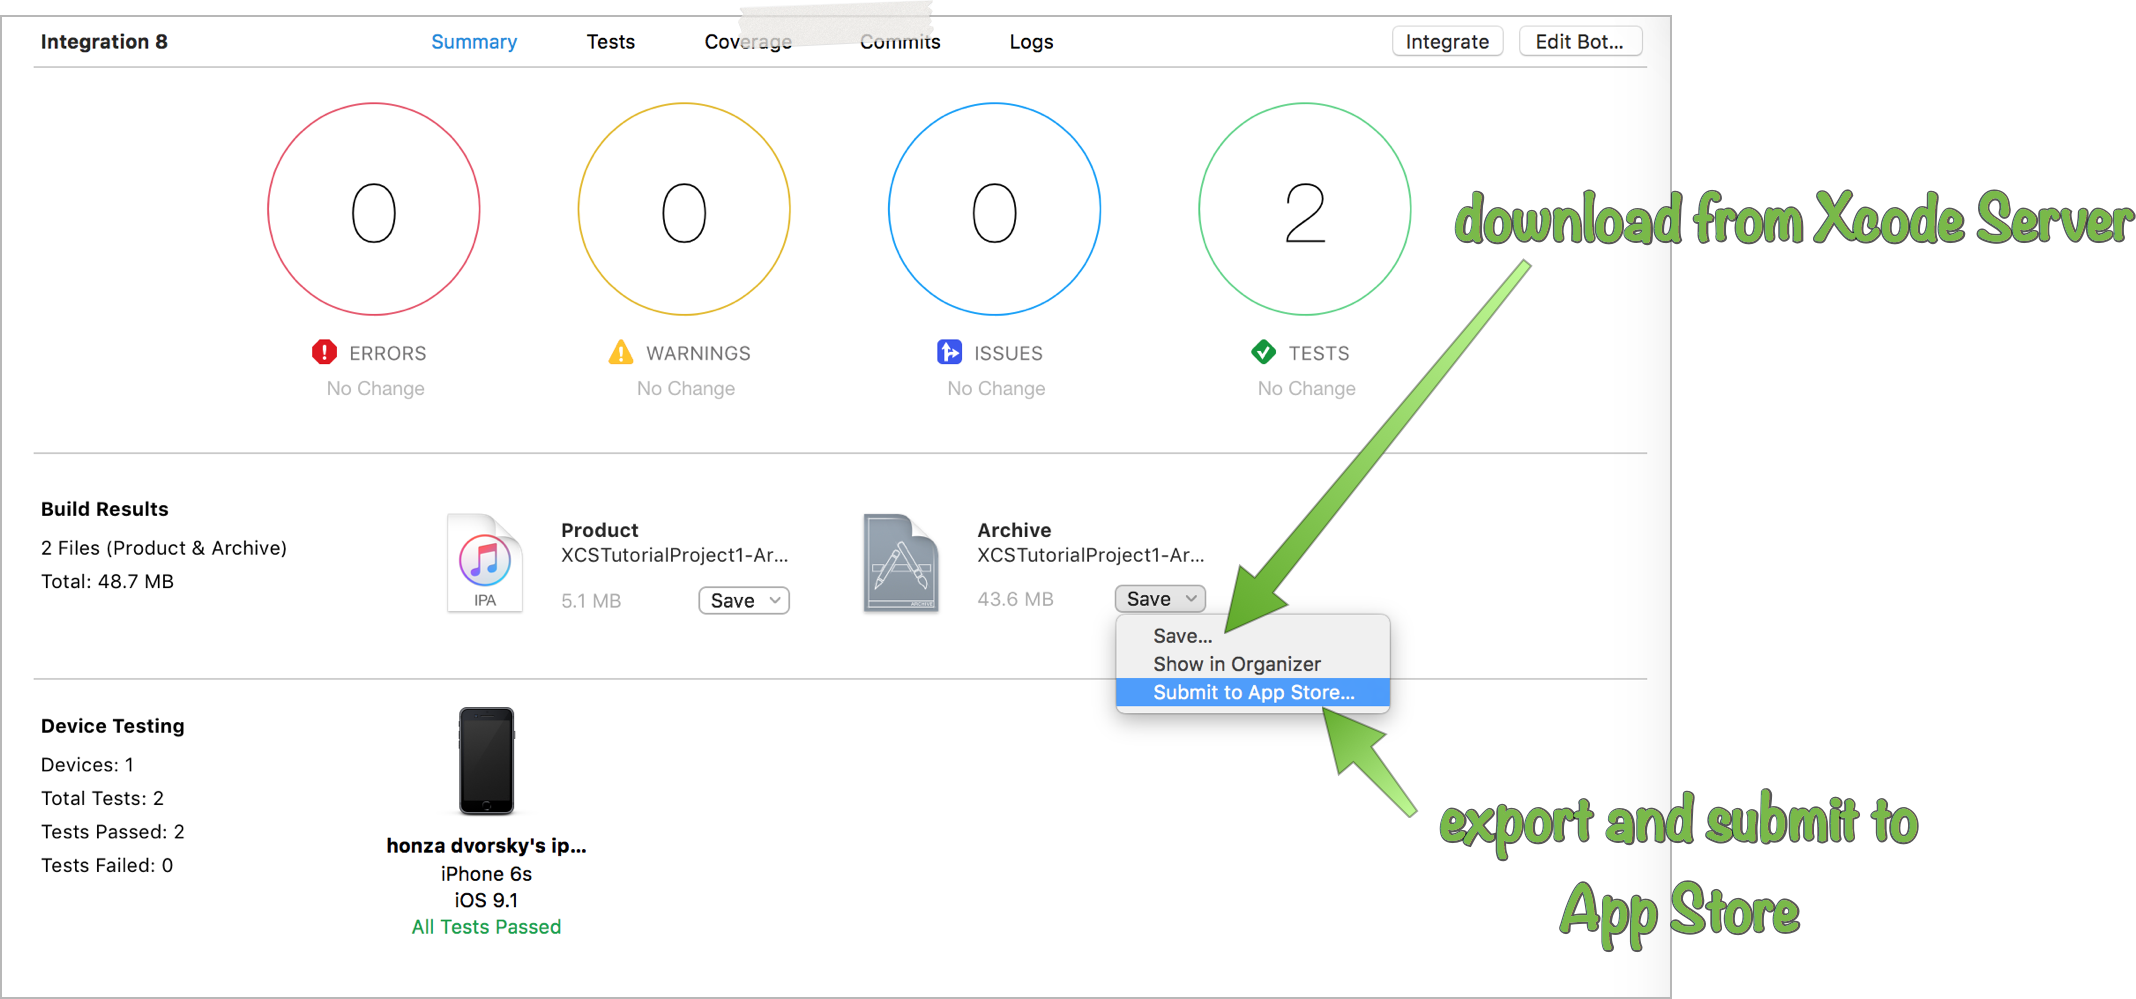
You can now see a new section in the Integration result, which contains the created Archive and an exported .ipa. This archive is ready to be downloaded or submitted directly to the App Store 🚀 (very neat!) Or, if you want to go further with fastlane and download this archive from Xcode Server and submit with fastlane, take a look at this fastlane action (created by yours truly.)
Also, check out all other deployment options (Crashlytics Beta, Hockey App, …) with fastlane. These can be plugged in in a postbuild script (previous tutorial, remember?) - you can use the environment variable XCS_ARCHIVE, which gives the path to the archive.
Conclusion
As you can see, once you tackle code signing on Xcode Server, a whole new world of opportunities opens up, where you can go from a mere commit to having your app submitted to a beta testing service, all completely automagically. fastlane brings an extremely simple way to plug all these actions together, making deployment of your app a matter of one line of code. By connecting it with the best Xcode-integrated CI solution, Xcode Server, you can really achieve an automation Zen, where you focus on your code and let computers perform the boilerplate tasks for you. Take advantage of all that. And dedicate the saved time to creating more things.
Extra Credit
Oh, I almost got away with it. You’d like to know how to install your app over Wi-Fi, huh? Here you go:
App Installation over Wi-Fi
Xcode Server takes care of all the difficult parts of this process, all you need to know is that to prepare your app, you need to have an Xcode scheme, which in its archiving action uses a configuration which allows installation on devices. Such as Debug (most likely) signed with a development profile. Or other configuration signed with an Ad Hoc profile. Or an Enterprise profile. You need to select that scheme when creating your Bot and Xcode Server will automatically create the .ipa for you (assuming you select Create user-installable product when setting up the Bot).
Let’s go through this step-by-step. In my sample app, I’ll just create a new Xcode scheme, which will use the Debug configuration for Archiving. In Xcode, go to Product - Scheme - Manage Schemes. There duplicate your existing scheme, and rename it (make sure it’s also shared). I named mine XCSTutorialProject1-ArchiveDebug. When you have it selected, click Edit and on the left, in Archiving, select the Debug configuration.
Commit all these changes, edit your Bot and in Info (first tab), change the scheme to your new scheme, in my case XCSTutorialProject1-ArchiveDebug. Save and rerun your Bot.
You should see a screen identical to the one we saw in Archiving earlier. On the surface, not much has changed. However, grab your iPhone now and make sure you’re on the same Wi-Fi as your Xcode Server. Open Safari on your phone and go to the canonical hostname of your server.
How to get the canonical hostname of your Xcode Server: In Terminal, run
curl -k https://YOUR_XCODE_SERVER_IP:20343/api/hostname
and you’ll get a JSON response with the hostname. That’s what you have to type into your phone, otherwise the installation will fail. For security reasons, you can’t access the server from your phone just by its IP address.
You’ll see a dashboard of your Xcode Server, listing all your Bots.
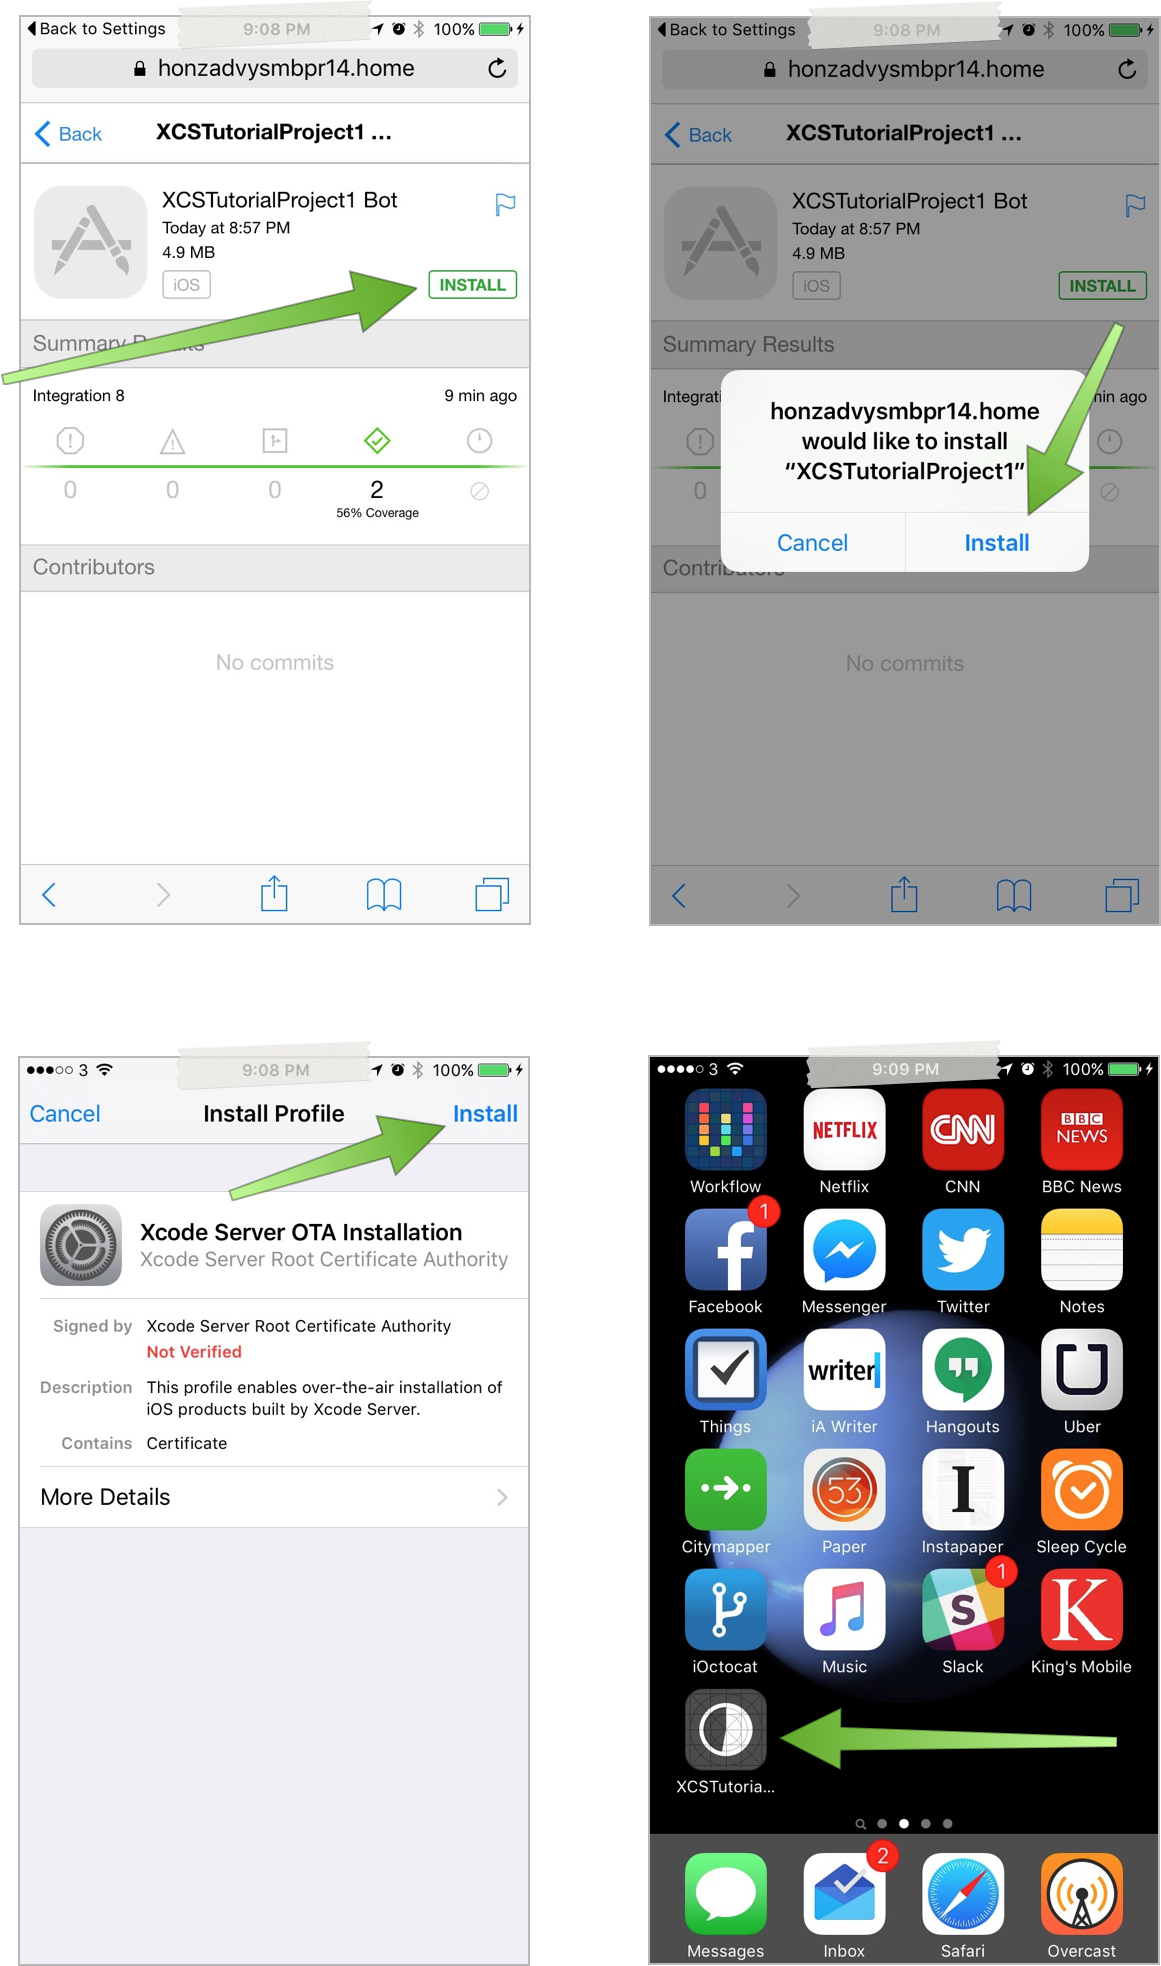
Tap on the Bot that just created the archive for you and click Install. If this is the first time, you’ll be asked to install a profile to allow installation from this Xcode Server. Go through the process carefully and make sure you install it, at the end you’ll get automatically redirected back to Safari. The Install button should now turn green and after tapping it, you’ll be asked to confirm the installation. Once you do and close Safari, you’ll see your app installing on your home screen. Sweet, nah? ⛵️
This is very useful when your team makes nightly releases, because it allows your non-technical colleagues to install the build every morning without ever touching Xcode.
Note that you can change permissions of who can connect to your Xcode Server over Wi-Fi, but here I was assuming you had open access for everyone. See the OS X Server app for restricting access to this dashboard.
Troubleshooting: If, after tapping Install, you’re getting a popup saying that installation failed, it’s likely that you had the profile installed and later deleted it (and a bug with a browser cookie is confusing Xcode Server). To force a reinstallation of the profile, on your phone visit
https://YOUR_SERVER_CANONICAL_HOSTNAME:20343/api/profiles/ota.mobileconfig
Real Conclusion
Now, this is really it for today. I hope you learned something or that this will be useful to you at some point in the future. Please keep the feedback coming, I’ve received many nice emails and tweets - I’m really glad these articles help some of you to get XCS set up faster.
This part concludes the Xcode Server basics that you really needed to know to deploy Xcode Server in the wild. Ping me with ideas of what you’d like to learn about next!
I hope you found this useful or interesting. For criticism, praise and future articles, I’m @czechboy0.dev on Bluesky.